Our Location
304 North Cardinal St.
Dorchester Center, MA 02124

In fact, what needs to be changed in most cases is the USB–>ESATA interface, so that Synology can mount an external mobile hard disk and use it as internal storage. Synology also supports expansion through the ESATA interface. Next we will explain how to change the USB interface to an ESATA interface or a SATA interface.
1. Execute the following command in the terminal. If you don’t know how to enter, please refer to the following tutorial.:Tutorial address
2. Modify the synoinfo.conf file
vi /etc.defaults/synoinfo.conf Find the following configurations in the file
esataportcfg="0xff000"
usbportcfg="0x300000"
internalportcfg="0xfff"
These three values respectively represent the port number range where the ESATA, USB, and SATA devices are located. That is to say, devices in the specified port number range will be recognized as the specified type (ESATA, USB, SATA). Our solution is actually to modify the values of usbportcfg and internalportcfg to identify the USB device as a SATA device.
First of all, you must first understand the range of these three port numbers, which are 0xff000, 0x300000, and 0xfff. Because they are in hexadecimal, you may not understand them. Below I post a map of the three values converted using the calculator that comes with WINDOWS. You can do it manually, open the calculator (change to programmer mode in the View menu), and then enter the above three values into the calculator.

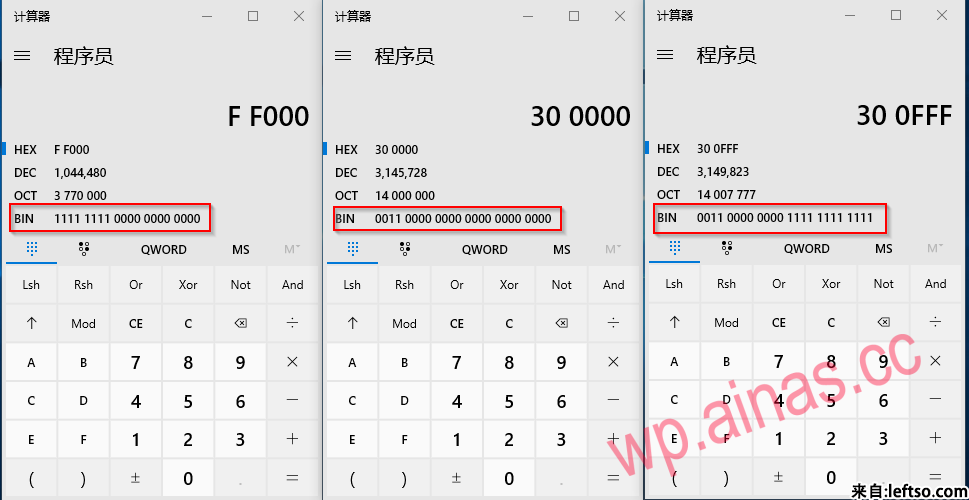
Everyone, observe where I drew the red box. Take it firstesataportcfgExample of port range,0xFF000, as you can see from the figure, the first from right to left13-20The bit is1, all others are in place0, in fact, the location of the device is the13-20identified asESATAEquipment, look againusbportcfgport range,0x300000, the same reason is actually that the location of the device is the21,22identified asUSBequipment,internalportcfgof0xFFFThat is, the location of the device is the1-12identified asSATAequipment.
It’s easy below, just putUSBChange the device’s port range toSATAdevice, then the system willUSBThe device is identified asSATAequipment to achieve the purpose of our operation. Let’s talk about the modification method below. The first step is the simplestusbportcfgChange to0, because we no longer need to let the system recognizeUSBThe equipment is ready (Friends who understand can actually test each modification, here I amUSBThere are two ports. If you only need to change one, just modify one of them.) The second step will be to modifySATAThe port range of the device isinternalportcfgHow much should the value of be changed to? It is actually very simple.3Zhang Tu is0xFFFIn that picture, the originalUSBequipment occupied21,22Click the left mouse button on the two locations and you will get the values in the figure below, which is0x300FFF
becauseESATAWe did not involve it so there is no modification, so the final modification value is as follows
esataportcfg="0xff000"
usbportcfg="0"
internalportcfg="0x300fff"
16 bays, 4 USB setting methods
maxdisks="16"
esataportcfg="0x0"
usbportcfg="0xf0000"
internalportcfg="0xffff"
26 disk slots, 0 USB setting methods
maxdisks="26"
esataportcfg="0x0"
usbportcfg="0x0"
internalportcfg="0x3ffffff"
After modification, save it and directly overwrite it back to the original path and then restart Synology, and you will be able to find your file in the storage space.USBEquipment
Starting ESATA after 6.2.4 has failed. After my continuous testing, it has been solved.
Problem analysis: Mainly because every time it is started, the new version of the boot system will initialize the synoinfo.conf file, which can be solved by recompiling the RR boot.
For repair methods, see:RR finished boot disk installation tutorialChapter 10
Operations are risky, so be cautious and back up important data first.
The ports of each motherboard are different and cannot be blindly modified to someone else’s value, otherwise yourNASCan’t connect.