Our Location
304 North Cardinal St.
Dorchester Center, MA 02124

Through RDM (Raw Device Mapping) method, the disk should be set to the local VMDK
Advantages: No need to add hardware or modify any configuration files, it is easy to configure and use
Disadvantages: If the hard disk needs to be adjusted, it needs to be remapped; Synology cannot obtain SMART information.
1.1. RDM direct access
ls -l /dev/disksView information about all currently mounted disks.
[root@HOME-ESXI:~] ls -l /dev/disks
total 1948588424
-rw------- 1 root root 500107862016 Jan 24 13:18 t10.ATA_____ST3500413AS_________________________________________5VMQDMFJ
-rw------- 1 root root 2550005760 Jan 24 13:18 t10.ATA_____ST3500413AS_________________________________________5VMQDMFJ:1
-rw------- 1 root root 2147483648 Jan 24 13:18 t10.ATA_____ST3500413AS_________________________________________5VMQDMFJ:2
1.2. Through commands
vmkfstools -z /vmfs/devices/disks/<pass-through hard disk identifier> /vmfs/volumes/<hard disk identifier where vmdk is saved>/<VMDK name>.vmdk, to mount; where <identifier of the pass-through hard disk> is a value similar to this in the previous commandt10.ATA_____ST3500413AS_________________________________________5VMQDMFJ;<The hard disk identifier where the vmdk is saved> can be found in/vmfs/volumes/You can see that the name of <VMDK name> is arbitrary.
[root@HOME-ESXI:~] cd /vmfs/volumes/
[root@HOME-ESXI:/vmfs/volumes] ls
1eeffc73-bcd27263-1e02-52d4b71eff6e 5e2966c6-05e642a6-2fa3-7085c2860b45 6d530177-2222d68b-7c96-8146fdca8e09
5e2966c0-51442ba6-628a-7085c2860b45 5e2966c6-ee8383fe-dd4c-7085c2860b45 local.vm.store
[root@HOME-ESXI:/vmfs/volumes] cd local.vm.store/
[root@HOME-ESXI:/vmfs/volumes/5e2966c6-ee8383fe-dd4c-7085c2860b45] mkdir DMS.store
[root@HOME-ESXI:/vmfs/volumes/5e2966c6-ee8383fe-dd4c-7085c2860b45/DMS.store] vmkfstools -z /vmfs/devices/disks/t10.ATA_____ST3500413AS_______________________________
______________5VMQDMFJ /vmfs/volumes/local.vm.store/DMS.store/disk4.vmdk
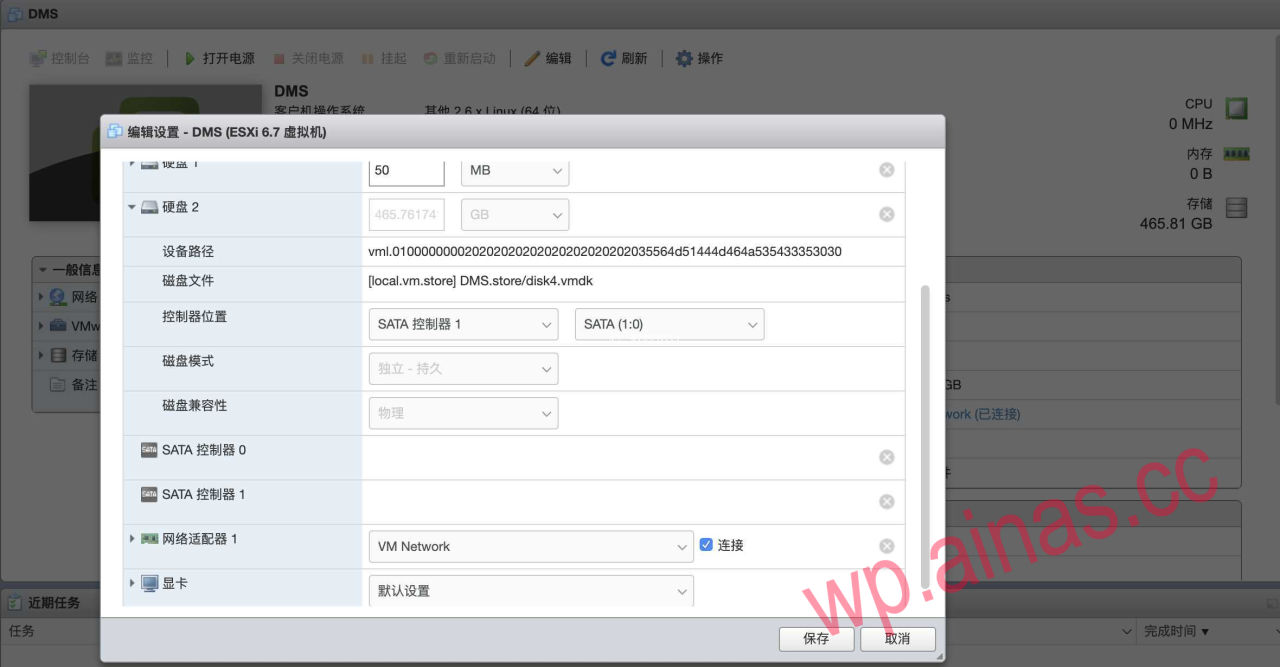
1.3. Set up Synology disk![[VMware]ESXI下硬盘的两种直通方式](/wp-content/uploads/2022/12/2605882-20220401223942975-1496386234.png)
At this point, the RDM passthrough setup is completed; multi-disk setup is similar.
by modifying
/etc/vmware/passthru.mapConfiguration file implementation
Advantages: Can pass through almost any PCIE device; no need to worry about disk order, etc.
Disadvantages: If you configure an AHCI device, the entire device will be mapped, and a certain hard disk cannot be individually mapped; the ESXI system configuration file needs to be modified; some do not support SMART information; memory space needs to be reserved.
2.1. Open the pass-through mapping file
vi /etc/vmware/passthru.map2.2. Check the device vendor ID (VID), device ID (PID) and other information on esxi![[VMware]ESXI下硬盘的两种直通方式](/wp-content/uploads/2022/12/2605882-20220401224014963-1214079040.png)
2.3, inpassthru.mapAdd the corresponding configuration in: vi /etc/vmware/passthru.map
# Intel Corporation Union Point-H AHCI Controller
# <vendor ID> <device ID> d3d0 default
8086 a282 d3d0 default
You can also use Xftp to log in to the device, and you can right-click to open it with Notepad to modify the file, and you can also make a backup copy
![[VMware]ESXI下硬盘的两种直通方式](/wp-content/uploads/2022/12/2605882-20220401224513626-774757600.png)
2.4. Restart the ESXI service
2.5. Enable direct connection![[VMware]ESXI下硬盘的两种直通方式](/wp-content/uploads/2022/12/2605882-20220401224607750-1203847540.png)
2.6. Configure Synology and reserve memory space![[VMware]ESXI下硬盘的两种直通方式](/wp-content/uploads/2022/12/2605882-20220401224630889-2117407227.png)
Pass-through of the core display is a very difficult thing in esxi. After many researches and repeated attempts, I can barely achieve the pass-through of the core display UHD630 to the Windows virtual machine for hardware decoding. However, in this case, the core display cannot perform HDMI output, and the virtual machine interface cannot be accessed from the esxi management console. Afterwards the virtual machine will only be able to be operated via Windows Remote Desktop.
On the esxi device passthrough page, devices such as cores and displays are grayed out by default and cannot be passed through, so you must first manually add these devices to the passthru.map file. SSH to esxi and find passthru.map
vi /etc/vmware/passthru.mapAdd it via vim
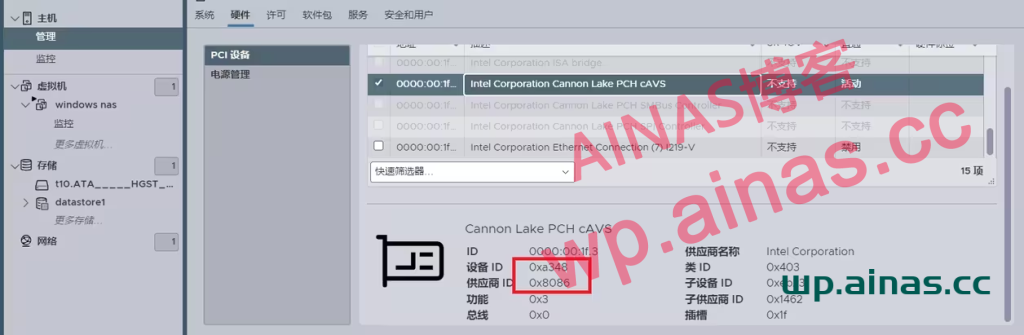
8086 ffff d3d0 defaultAmong them, 8086 is the manufacturer code, which refers to Intel, and ffff is the device code, which means all devices. If you do not want to directly connect to all devices or want to directly connect to devices other than Intel, you can check the manufacturer code and device code from the picture below.
View the manufacturer code and device code of a device
After modifying the configuration, restart esxi. Don’t rush to enter the system. Enter the BIOS to confirm whether VT-D is turned on. If VT-D is not turned on, devices such as core and display cannot be passed through. After opening VT-D, start esxi. If everything goes well, you can see that a series of Intel devices have changed from gray inoperable to dark selectable in “Management” > “Hardware”.
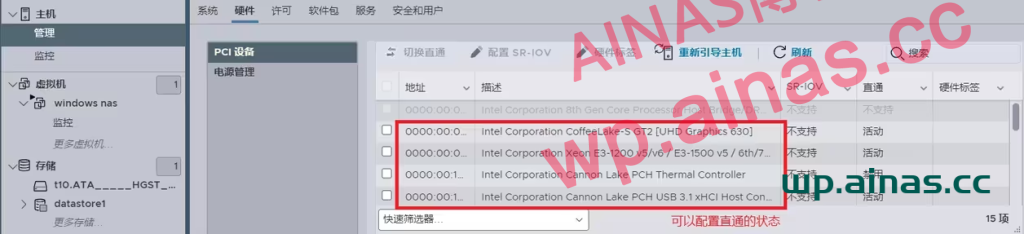
It can be clearly seen that there is a UHD 630 core display device that can be passed through.
SSH into esxi and execute the command:
esxcli system settings kernel set -s vga -v FALSEThis command stops esxi from using the core display, and then completely controls esxi through the web management terminal. Restart esxi after the command passes. If you originally had a monitor connected to the host, the original yellow frame interface of the esxi background will not be displayed after the restart. Instead, two lines similar to error reports will be displayed in the upper left corner. This is normal and does not affect the use of the web console connection.
Log in to the EXSI host again in the web console, and add a parameter in the Edit Virtual Machine page, Virtual Machine Options>>Advanced>>Configuration Parameters>>Edit:
hypervisor.cpuid.v0 = “FALSE”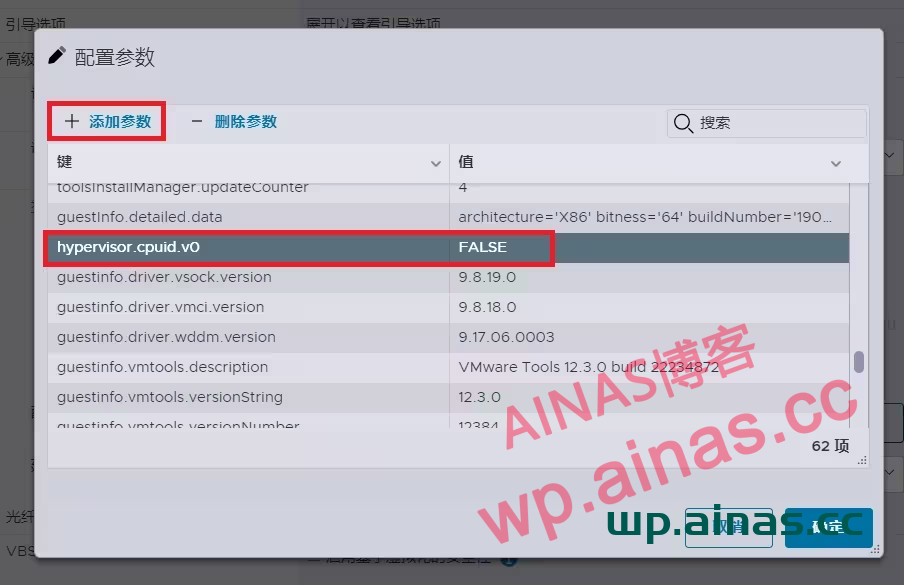
This parameter can fool the operating system into not thinking that it is running in a virtual machine, and thus directly load the graphics card without virtualization conversion.