Our Location
304 North Cardinal St.
Dorchester Center, MA 02124


Cat disk is a smart hard drive. Built-in 1TB mechanical hard drive and Gigabit network card, suitable for individuals, families and small and micro companies. The data can be quickly stored in the local device without carrying it. It can be viewed and shared anytime and anywhere through the Maopan App, which is very convenient. What’s more important is that not only can you use it, but also multiple people can use it together. You can log in with your mobile phone number without affecting each other.
The above is from the official introduction of Maopan
Since 2017, “blockchain” and “mining” have become popular on the Internet. At the same time, Wanke Cloud, Maopan, Interstellar Snail, Baofeng Boku Cloud and so on. A large number of blockchain products have been launched. Of course, after more than 2 years of market baptism. A large number of enterprises and mine owners have encountered “mining disasters”. The large amount of equipment that was originally accumulated is no longer enough to support the hardware and electricity bills. Then the eliminated hardware can only be disposed of at a low price to restore blood.
Today’s protagonist is the “Cat Pan”, a small device that is only the size of a palm but has all the internal organs.
In addition, although the cat drive is not large in size, the built-in space can accommodate a 2.5-inch hard drive plugged into the SATA3.0 port.
Enthusiastic masters rewrote Uboot for Catpan, and also produced Heiqunhui firmware suitable for Catpan. This allows our cat tray to produce greater waste heat. At the same time, the hardware of Maopan is almost the same as Synology’s official device DS119J. (The memory of the cat disk is 512M, while the memory of the DS119J is 256M) So compatibility is definitely the first choice of Heiqunhui. After all, the cat disk is small in size and saves power.
In fact, all the above firmwares can be used when using Maopan with Synology, but from the perspective of convenience, Synology is undoubtedly the most popular version. Mmm, it smells so good. Even the Shanqunhui version on Xianyu costs some soft money.
There is essentially no difference between “Shanqunhui one-machine one-code encrypted version” and “Shanqunhui unrestricted version”. The so-called encryption means that you need to provide the hardware UID of the machine to the firmware seller. The seller will generate a firmware for you based on your UID that is only applicable to your cat disk hardware. If you want to swipe to other cat trays. Um, sorry, can’t start.
Therefore, since the “unrestricted version of Single Qunhui brushing” was released by the master on November 7, it means that all Maopan hardware can freely and conveniently use Qunhui.
1. Format the U disk into Fat32 format and copy the “full.bin” file to the U disk;
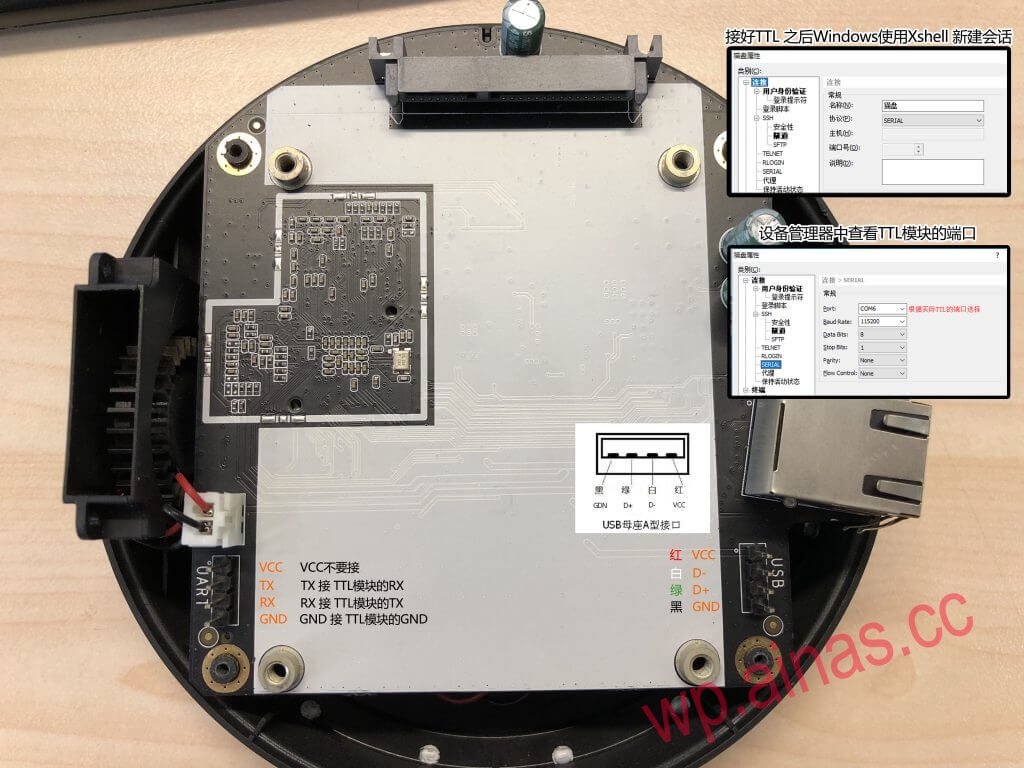
2. Connect the cat drive to the TTL cable, plug the TTL module into the computer, plug the USB female socket into the cat drive, and insert the U disk we just made into the USB female socket (do not connect the cat drive to the hard disk, and do not plug in the power supply)
3. Open the Xshell software (an error message will appear, Initialize Flexnet Service failed / Error code: 50003, because of a problem with the portable version. It doesn’t matter)
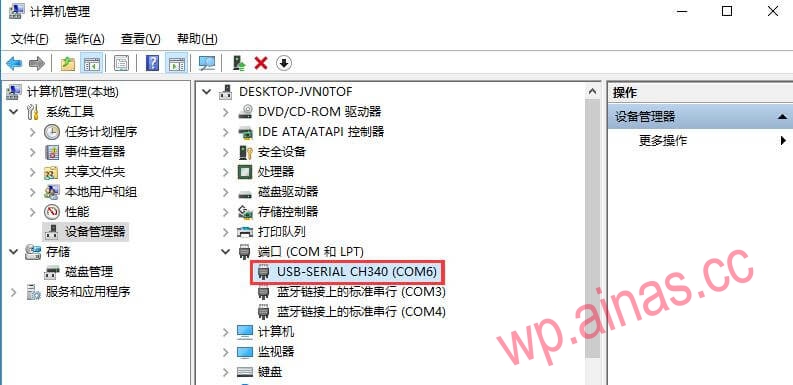
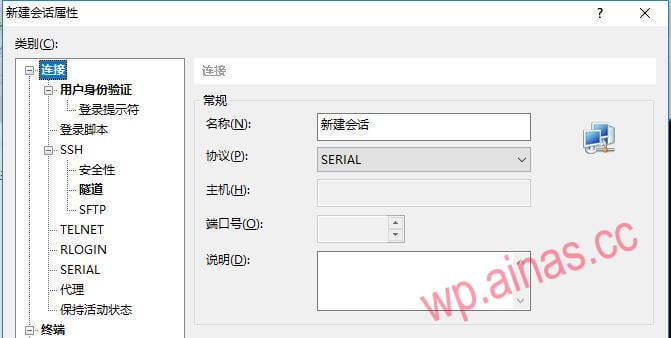
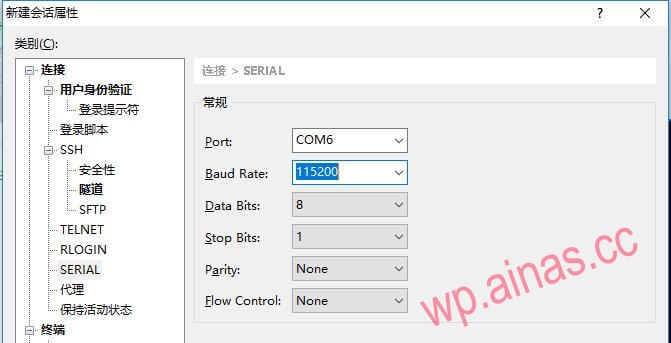
Create a new session, select “SERIAL” as the protocol, and set the “Port” and “Baud Rate” in the SERIAL options.
and click link session in Xshell. Wait for power on.
4. When the cat disk is powered on, Xshell displays the default scrolling information and at the same time, press Enter to interrupt entry. Until it appears: Marvel>>
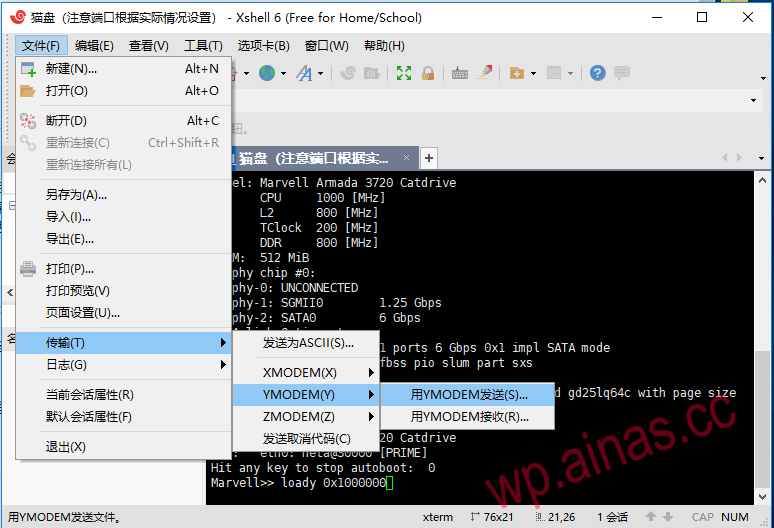
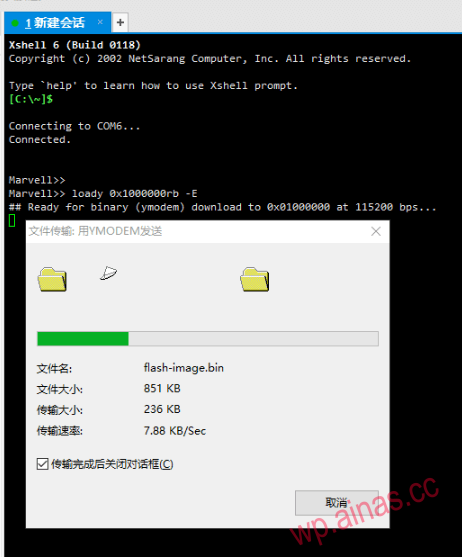
5. Copy the following command to Xshell, but do not press Enter!
loady 0x10000006. Click “File” – “Transfer” – “YMODEM (Y)” – “Send with YMODEM (S)” in Xshell, and then select “flash-image.bin” in this compressed package to upload. Refer to the picture below:
7. Enter the following commands line by line on the Xshell side
sf probe
sf probe
sf erase 0x0 0x800000
sf write 0x1000000 0x0 0x000d4fc0
sf probe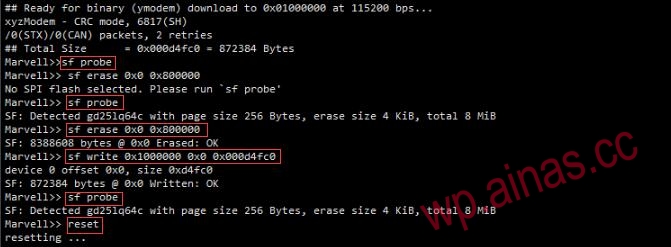
(Be sure to wait until the above command is executed before executing the next line)
8. Enter reset and press Enter to restart the system.
9. After the restart is complete, press Enter to interrupt. Re-enter Marvel>> and enter:
bubt full.bin spi usb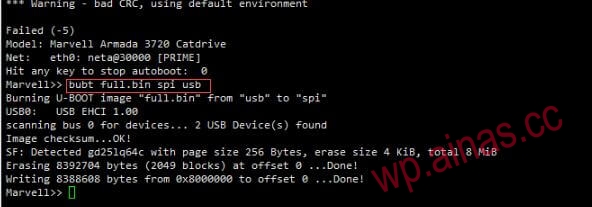
Then press Enter. After pressing Enter, wait for this command to finish running. You can enter reset to restart. Until DiskStation login: appears, it means the flash is successful. Then you can follow the normal Black Synology installation tutorial for subsequent steps.
Banbai: Unlock some functions (such as transcoding, thumbnails, etc.)
As long as the SN is a genuine SN
All white: Unlock all functions, including Synology’s official QuickConnect (Synology’s intranet penetration), etc.
Requires one-to-one correspondence between SN and MAC
Here you need to download a bin editing software:winhex, and then calculate the verification codes of MAC and SN through arithmetic, and modify the corresponding parts, as shown in the figure:
 猫盘专栏 第3张")
Here you need to perform relevant operations in Synology. Now follow me step by step, with pictures and instructions:
This is very simple. Just like the computer needs to create a directory, Synology also needs to create it automatically when installing the package. We can also create one. It is very simple. Here I will use the docker folder as an example to explain.
This is in the control panel. First find the scheduled task option, as shown in the figure:
 猫盘专栏 第4张")
Then, we need to create a custom script, which is the DD command, to copy the bin file with SN and MAC to Synology’s docker directory. The detailed operation is as follows:
The script is as follows:
dd if=/dev/mtdblock3 of=/volume1/docker/vendor.bin 猫盘专栏 第5张")
 猫盘专栏 第6张")
 猫盘专栏 第7张")
Then click Run:
 猫盘专栏 第8张")
In this way, you can find a file vendor.bin in the docker folder,
(3) Modify the MAC and SN of the bin file
At this time, it needs to be edited. The method is related to the first method of modifying the firmware. The software is the same and the method is the same. Here I will apply the previous diagram of modifying the firmware to explain in detail. The location may be slightly different, but the method is the same, as detailed in the figure:
The things used are winhex, execel file, and bin firmware. Just save it after the modification is completed.
 猫盘专栏 第9张")
(4) Create another script in the same way and run it
The method is the same as (2), but the script is different. The script is as follows:
dd if=/volume1/docker/vendor.bin of=/dev/mtdblock3Just run the task script and then restart Synology. The method is also very simple. You can also perform related operations through tools such as putty.
If the information center page appears blank, please modify the synoinfor.conf file
sed -i 's/supportsystempwarning="yes"/supportsystempwarning="no"/g' /etc.defaults/synoinfo.conf