Our Location
304 North Cardinal St.
Dorchester Center, MA 02124

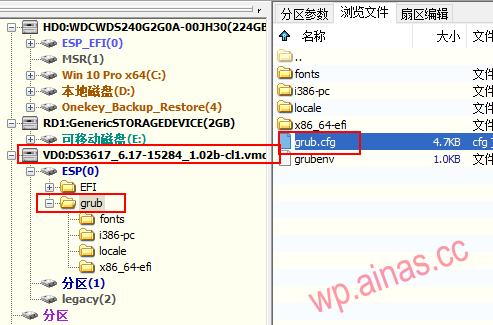
Check the U disk to the computer. If the drive letter is not displayed when plugged into the computer, you can useDiskgeniusOpen the U disk, select the corresponding file found in the first partition, copy it, and replace the file with the same name after modification.
Find the grub.cfg file
![图片[1]-群晖系统安装以及激活教程-lina520](/wp-content/uploads/2022/11/20220417015228225.png)
Right-click the grub.cfg file and copy it to the desktop or other area
![图片[2]-群晖系统安装以及激活教程-lina520](/wp-content/uploads/2022/11/20220417015229511.png)
Next open Notepad++
Use Notepad++ to open the grub.cfg file
Roughly found around line 22 are pid vid and sn macwords
![图片[3]-群晖系统安装以及激活教程-lina520](/wp-content/uploads/2022/11/20220417015230723.png)
There is no need to modify the VID or PID when booting a virtual machine or hard disk, so as long as the format is correct, ignore it.
3Replace it with your SN code, make sure there are no spaces after it or before it.
4Replace it with your MAX address. Note that there should be no spaces after 00 or before it.
Please add according to the actual number of network ports. If it is a dual network port, please add mac2=xxxx and change netif_num to 2.
![图片[4]-群晖系统安装以及激活教程-lina520](/wp-content/uploads/2022/11/20220417015231524.png)
Drag the modified file back to replace the original file
![图片[7]-群晖系统安装以及激活教程-lina520](/wp-content/uploads/2022/11/20220417015232201.png)
![图片[8]-群晖系统安装以及激活教程-lina520](/wp-content/uploads/2022/11/20220417015233879.png)
![图片[9]-群晖系统安装以及激活教程-lina520](/wp-content/uploads/2022/11/20220417015234232.png)
![图片[10]-群晖系统安装以及激活教程-lina520](/wp-content/uploads/2022/11/20220417015235167.png)
![图片[11]-群晖系统安装以及激活教程-lina520](/wp-content/uploads/2022/11/20220417015236473.png)
Insert the modified USB disk into Synology and reboot.