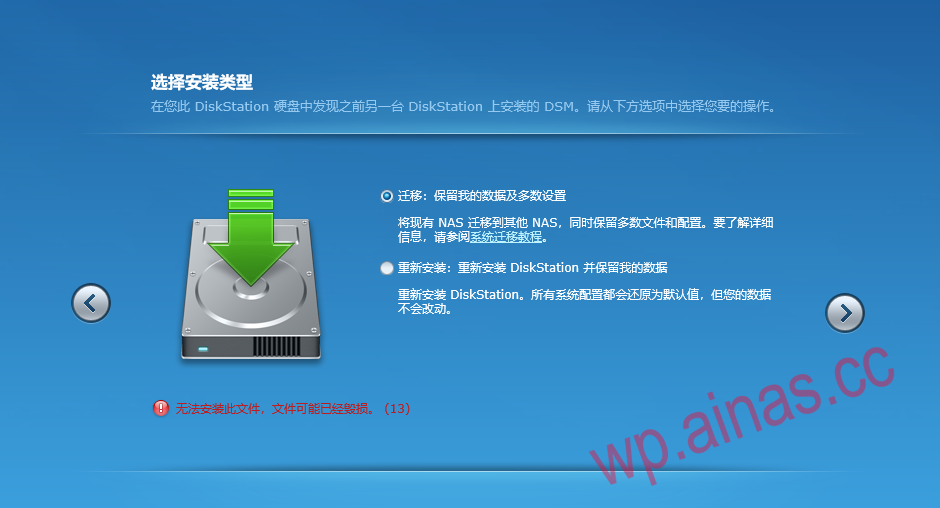
1. Common error handling?
If code 13 solution (Figure 1) or other error solutions appear after restarting:

1. There is a problem with booting. The file may have been modified during system installation or other reasons.
2. The system version in the hard disk is higher than the boot disk version.
3. The transfer screen appears repeatedly
Solution:Check whether the VID and PID in the grub.cfg file match those of the USB disk.
Solution:The hard disk is too poor or other factors affect the system installation. Please use other hard disks to install or try again several times. The data is not important. Try deleting all partitions on the hard drive. If there is important data in it, format the first partition of all Synology hard drives and then reinstall the system (this only clears the settings, and theoretically the hard drive files will not be lost)
Solution: Snail A double or B double or some special motherboard needsGo into the BIOS settings and find any one of the three settings.
1. Advanced->Miscellaneous Configuration->OS Selection is modified to: Windwos 8.x.
2. Chipset->South Bridge->USB Configuration->USB2.0(EHCI) Support is modified to: Disabled;
3. Chipset->South Bridge->USB Configuration->XHCI Mode is modified to: Enabled.
Please note that if any of the above three is set, the other two will automatically adjust to the corresponding parameters, so just find the similar parameter position in order and adjust one of them (some motherboards may have different names, but most of them should be called this). In fact, the above three modifications are actually the same. When the OS Selection is modified to Windwos 8.x, the USB settings are changed to 2 and 3. The operations of 2 and 3 are manual modifications, but the OS Selection is still Windwos7.
Solution:HP HP gen 10 Please note that the built-in USB cannot be used.
4. Click to install the latest version of the system during installation. (The 6.2.3 guide can currently be installed directly online, but if it fails at any time, you can only use the following method)
Solution:Format the first partition of each hard disk in Synology, re-boot the USB disk, and reinstall
5. There is a problem with the downloaded system file.
Solution: Download the file again
6. There is a problem with the partition format of the hard disk Synology or there is a two-in-one boot in the hard disk.
Solution: Enter the PE into Synology and use diskgenius to delete all partitions of the SSD boot disk.
2. Download the PAT installation file
918-6.23 installation files 3617 6.23 installation files 3615 6.23 installation files
3. Start the installation
1. Insert the USB flash drive and set the default boot mode on the motherboard to boot from the USB flash drive. For specific settings, please search for relevant methods.
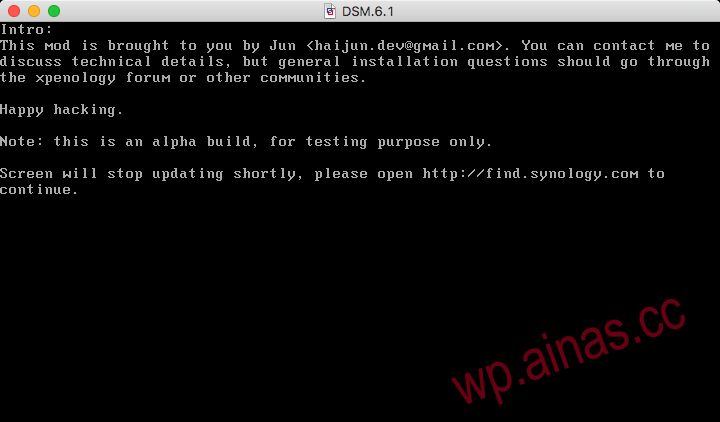
2. By default, select the first DS3617xs 6.1 Baremetal with Jun’s Mod v1.02-alpha after booting from the USB disk and press Enter.![[IMG]](/wp-content/uploads/2022/12/2017041711.png)
 3. Prompt Please openhttp://find.synology.comto continue and wait for 1-2 minutes.Another computer in the same LANEnter in the browserhttp://find.synology.com/, search DSM, if not found, then use SynologyAssistant to find
Domestic mirror:Download address4. Follow the prompts to continue, click Manual Installation, select the pat file downloaded previously, and then click Install Now.![[IMG]](/wp-content/uploads/2022/12/201704jvj-1.png)
![[IMG]](/wp-content/uploads/2022/12/201704opo-1.png)
![[IMG]](/wp-content/uploads/2022/12/201704aea-1.png)
![[IMG]](/wp-content/uploads/2022/12/201704ada-1.png)
![[IMG]](/wp-content/uploads/2022/12/201704hoh-2.png)
![[IMG]](/wp-content/uploads/2022/12/201704uyu.png) After the computer automatically restarts, it enters some basic settings, which can be set according to your own requirements.
After the computer automatically restarts, it enters some basic settings, which can be set according to your own requirements.![[IMG]](/wp-content/uploads/2022/12/201704gjg.png)
![[IMG]](/wp-content/uploads/2022/12/201704sus.png)
![[IMG]](/wp-content/uploads/2022/12/201704hph.png)
4. Basic settings and precautions after installation is completed
1. Don’t upgrade, don’t upgrade, don’t upgrade. You can go to the Control Panel – Update and Restore settings.
2. Don’t upgrade yet, turn off the DSM automatic update option in any plan.