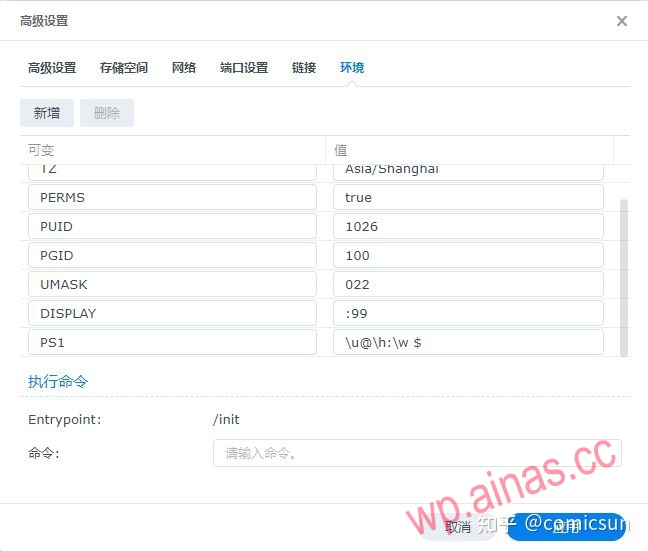
Our Location
304 North Cardinal St.
Dorchester Center, MA 02124

If your Synology is a 6.+ system, your location should be filled in:
https://spk.imnks.com/If you are using Synology 7.+ system, your location should be filled in:
https://spk7.imnks.com/These two are different because Synology’s systems, 6.+ and 7.+, have different installation package formats. Click to open Package Center
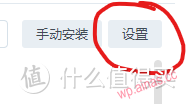 Click settings
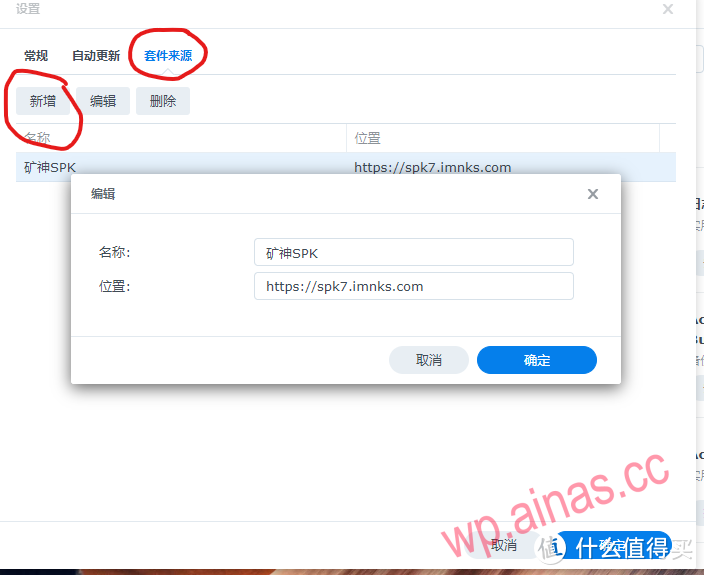 Select the package source, click Add, enter according to the content of the picture, and enter https://spk7.imnks.com in the location.
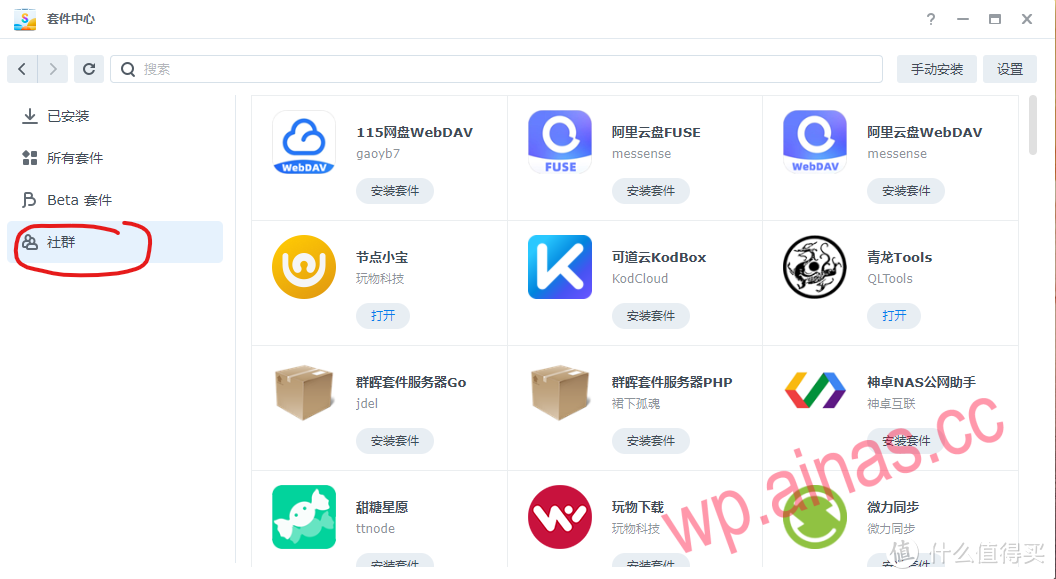 After saving, you will be able to see a community option here. Click on it to see the integrated suite of Mine God.
Okay, the package source has been added above, and you can already see it in the community. Haha, are you excited? Do you want to click to install right away?
Congratulations, you are overly excited. Before clicking to install, you need to install python3.8.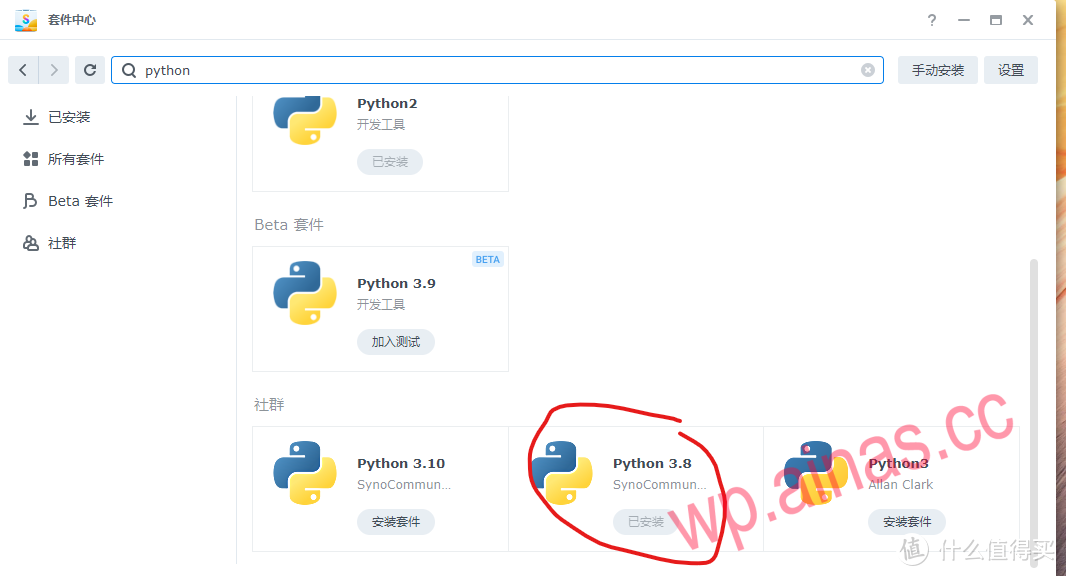 In the search bar, enter python, and several will come up. Find python 3.8 and click to install it.Well, after installation, you can happily install nastools.
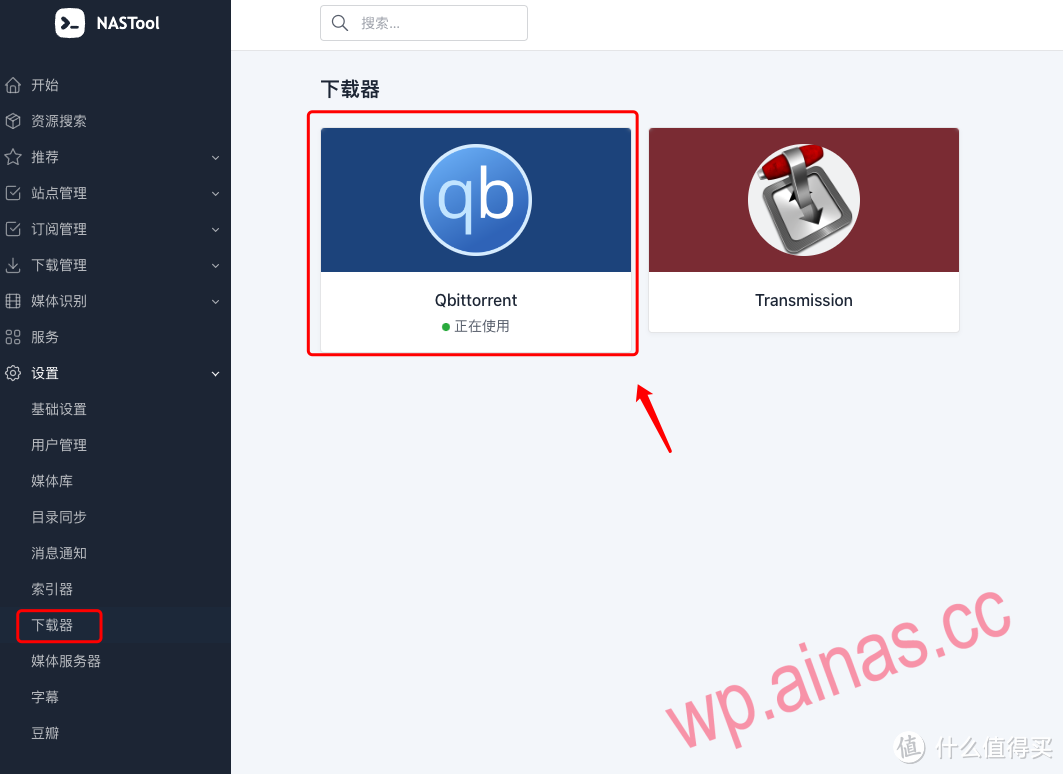
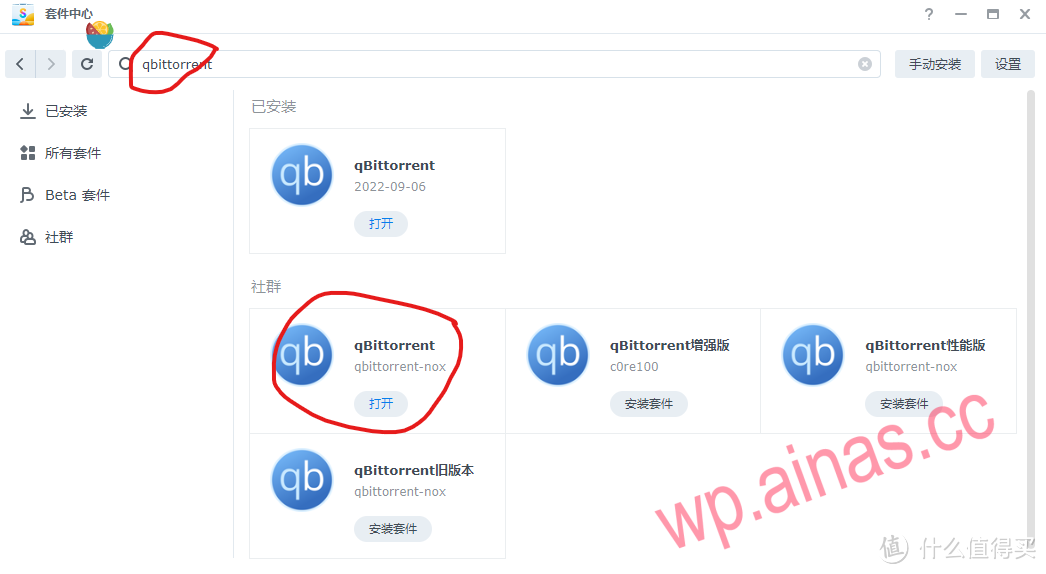 As for which download software to choose, it depends on what you like. I am used to using qbittorrent. Of course, you can also choose transmission. Of course, you can also choose Aria2. This is really up to you.
Open the package center, select qb add, and install the package
Enter IP:8080 in the browser to open the browser page. Default username: admin Password: adminadmin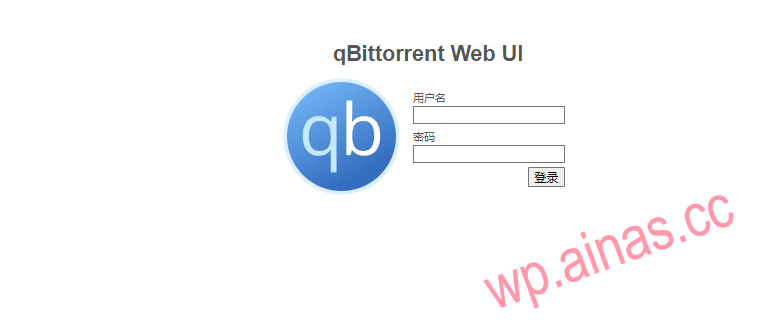
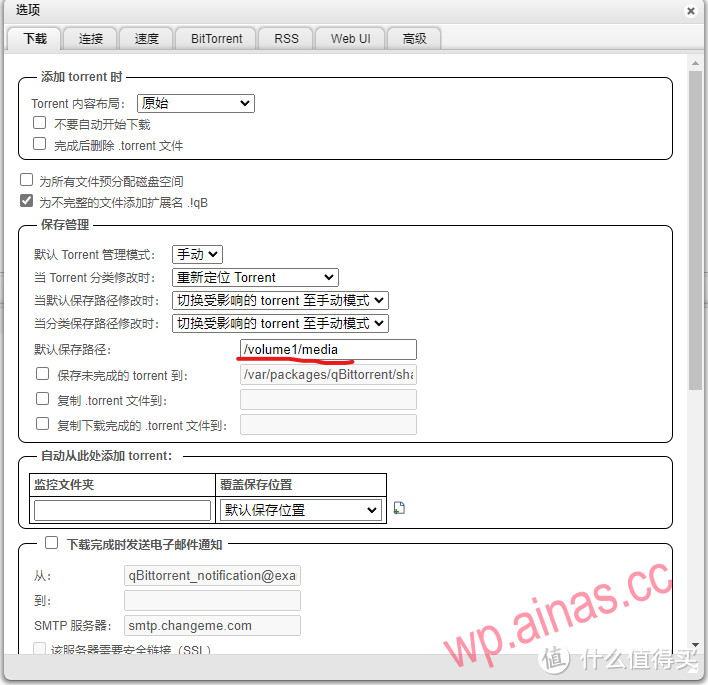
Change the download settings inside to the following picture:

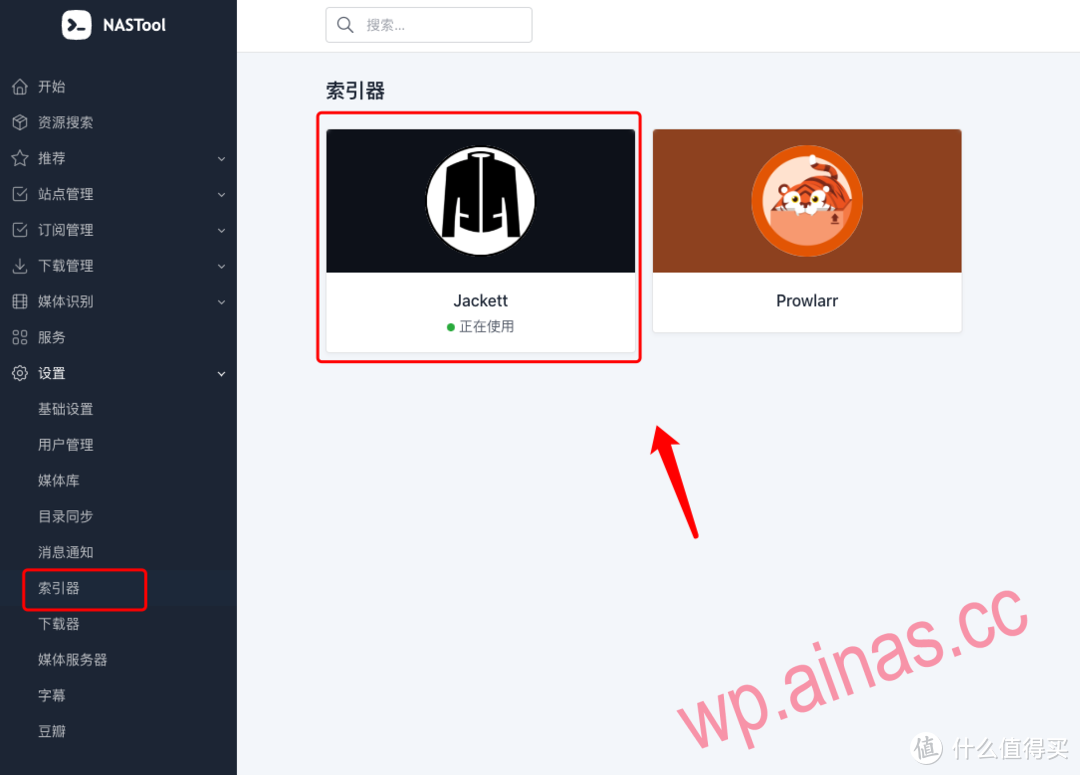
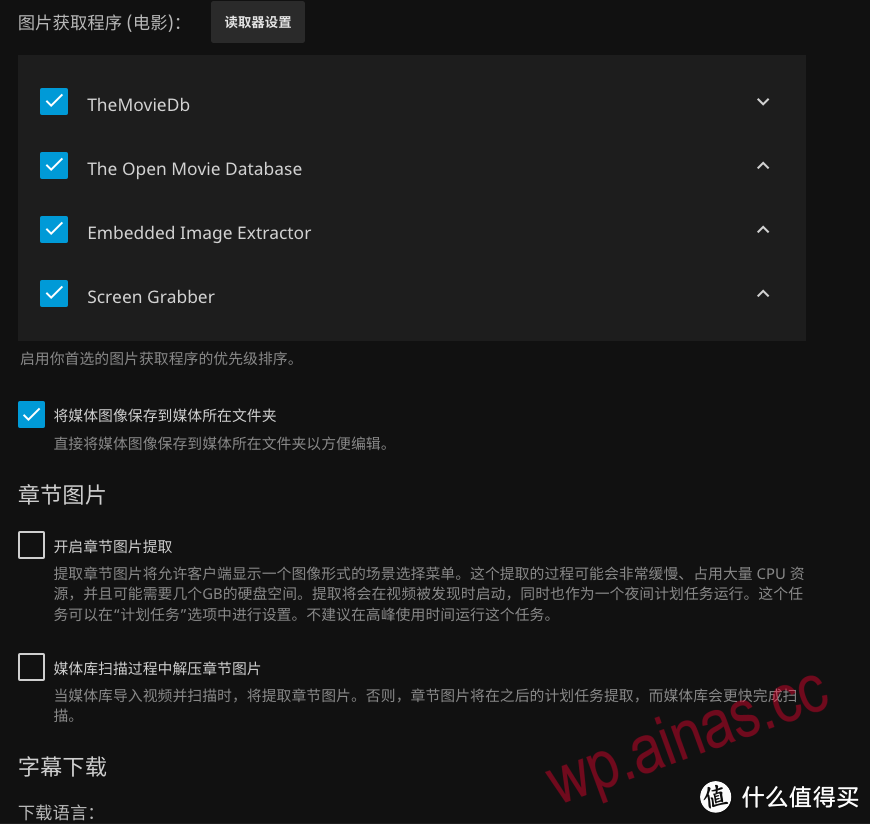
Now let’s talk about the indexer. The author of the new version of the indexer has added a “built-in indexer”. I think this is easier to use than others. As long as I maintain my site information in site management. It can be used directly. There is no need to deploy other indexers. There is just a small flaw, that is, you cannot choose to download only free resources.
At this point, you have two choices
You can deploy however you want here. I won’t go into details. I assume that you choose the lazy version by default and directly use the packaged version of Mine God to install and deploy.
At this point, because the author has developed a built-in indexer, you only need to maintain the site well before it can be used. So it’s the same. If you use the built-in one, you don’t need to deploy it separately. If you don’t use it, just search for jackett in the package center and install it.
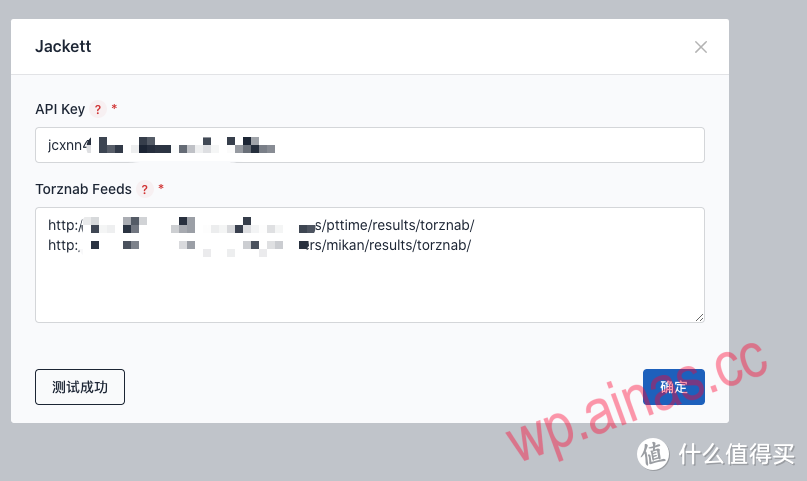
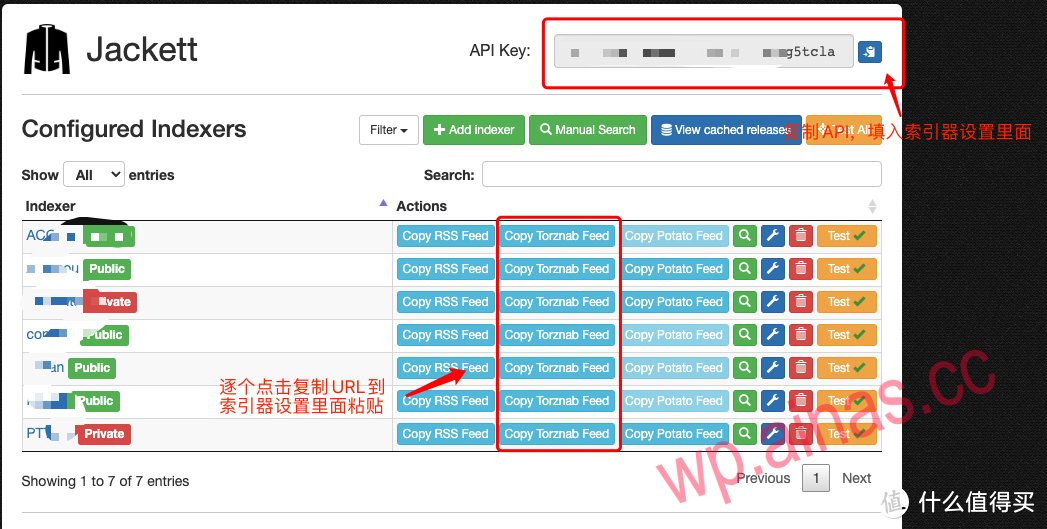
The author of jackett has also optimized it. There is no need to copy the site URLs you set one by one like before. When you enter the jackett page, set the password below, and then directly use the web address + API + password.
Jackett has two purposes: one is to search directly in Jackett, and the other is to provide information sources for other tools.
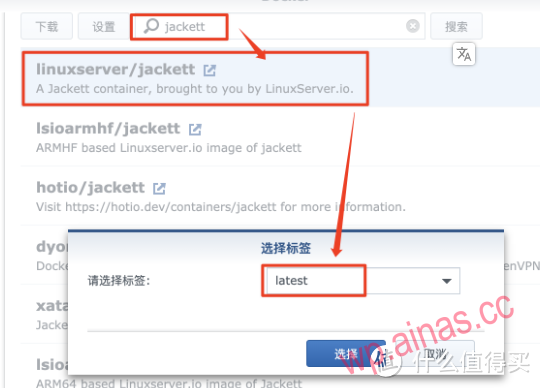
Search for jackett in the registry, select the first linuxserver/jackett, and select latest for version.
 Download container
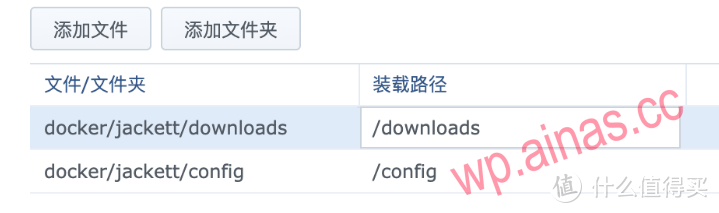
In the docker folder, create a new folder and name it jackett , then create two new folders inside the jackett folder: config and **downloads ** .
 mapping file
File mapping is set as follows
/docker/jackett/config:/config (directory where configuration files are saved)
/docker/jackett/downloads:/downloads (download directory, used to save torrent files)
 set up
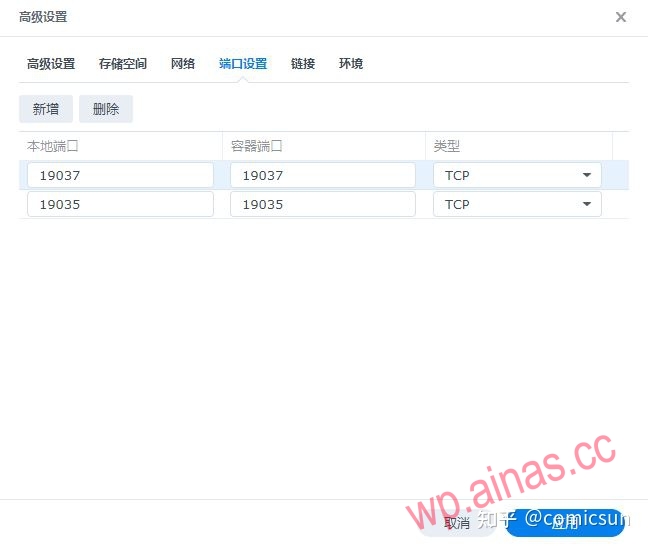
As long as there is no conflict in the port, the local port is arbitrary and the container port is 9117.
 Run container
Enter http://Synology IP or domain name:9117 in the browser, and you will see the main interface.
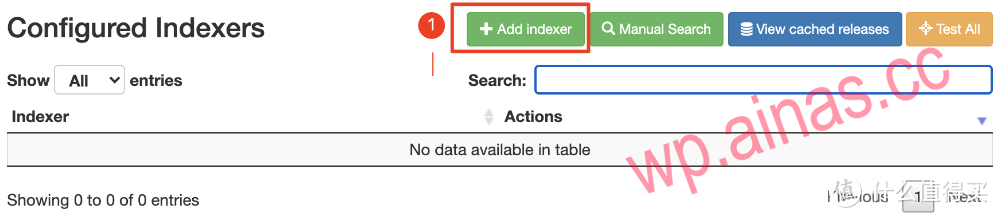
Add indexer
Select Add Indexer
 Indexer
Select as needed. If the type is private or Semi-Private, you need to log in to use it.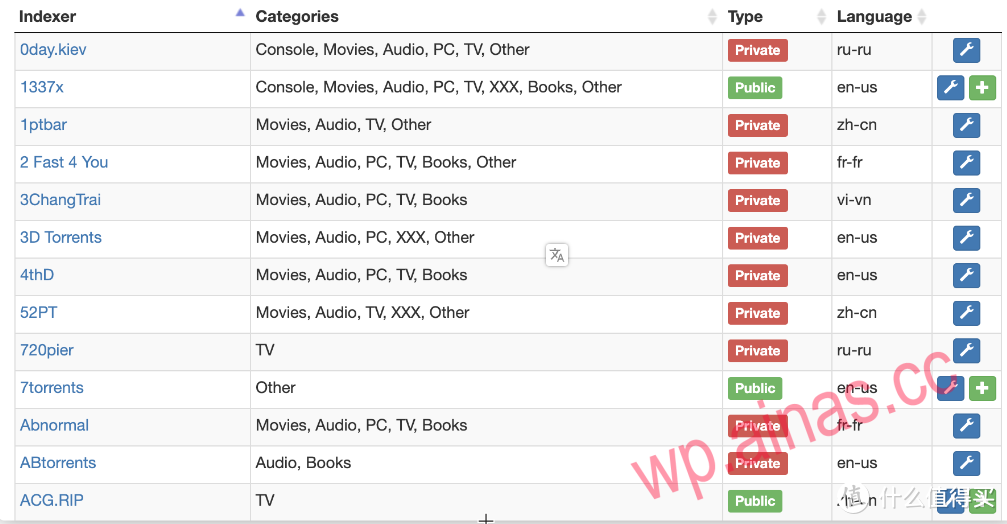
After adding the index, click search. It is the same from both places, and you can search for the resources you want.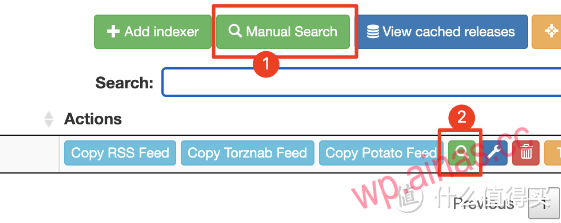
To generate an RSS subscription, you only need to copy the RSS Feed. If you want to generate an RSS subscription with a query, you only need to modify the parameters q (search string) and cat (category).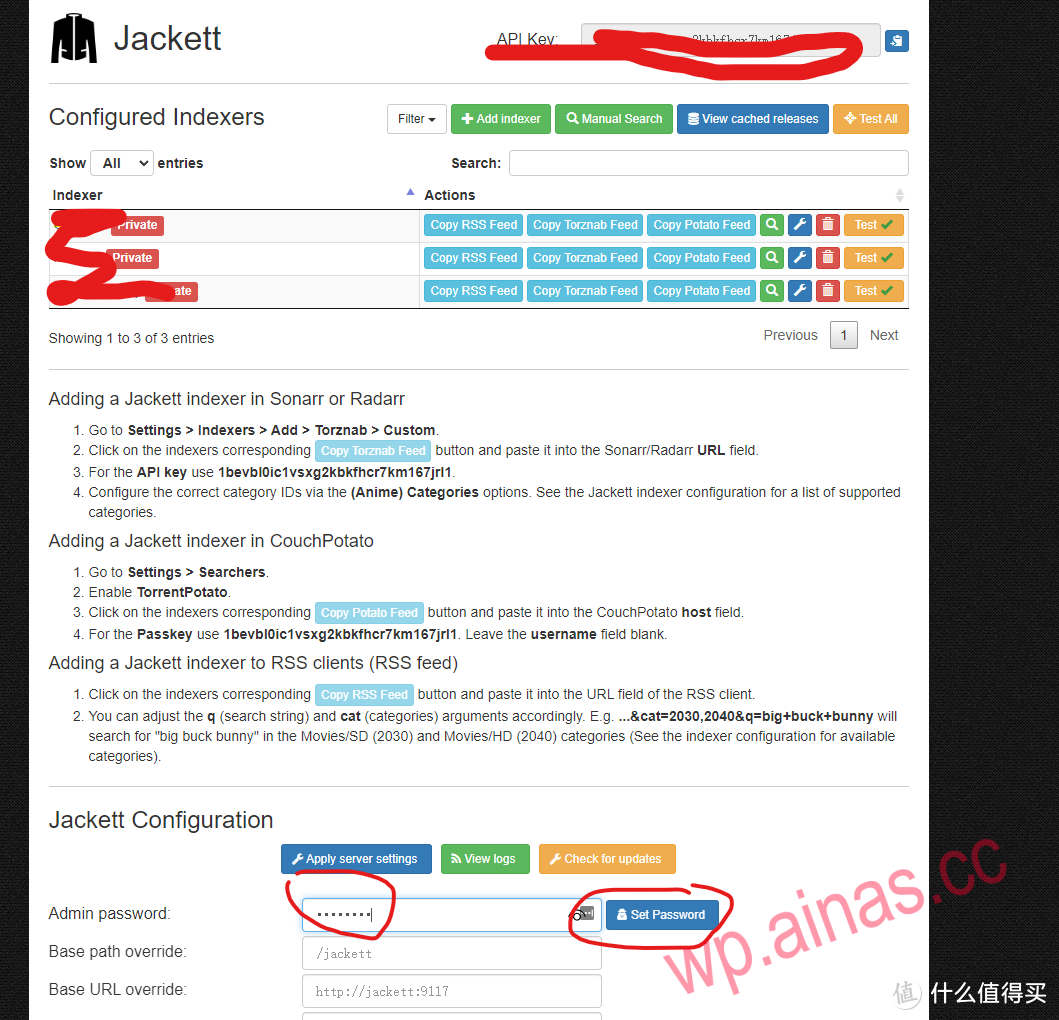

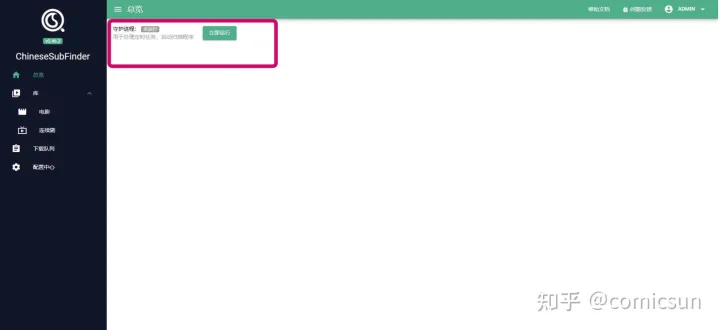
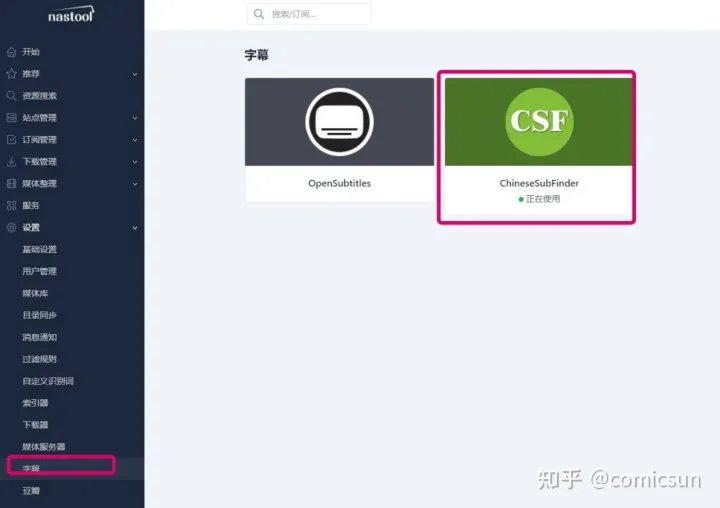
Attachment 1. Manually download subtitles
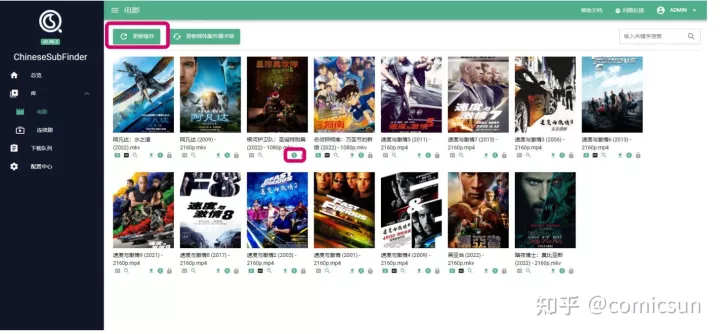
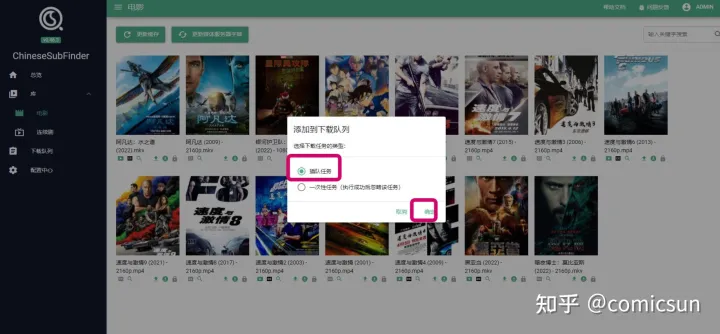
Attached is 2. Subtitle settings in nas-tools

 If you don’t understand the picture above, just copy and build it according to my instructions. Let me reiterate, you can’t cross the market, you can’t cross the market.
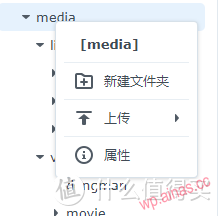 Right click on media and select properties
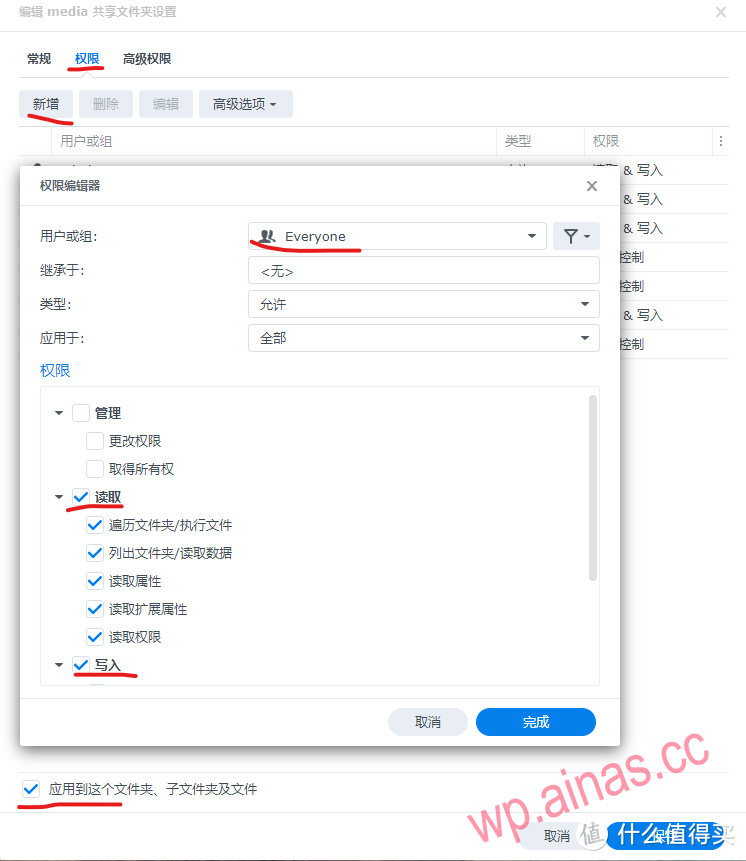 The purpose of giving everyone permission here is to prevent everyone from understanding it. If you understand Synology’s permission settings, you can individually enable read and write permissions for nastools, download software, and media servers.After this setting, the packages you install and the containers deployed by docker can access this folder. Many people have failed in Synology’s deployment without setting access permissions, resulting in inability to access even if the deployment is successful.
Okay, now, the directory hierarchy and permissions have been completed. The next step is the settings in nastools.
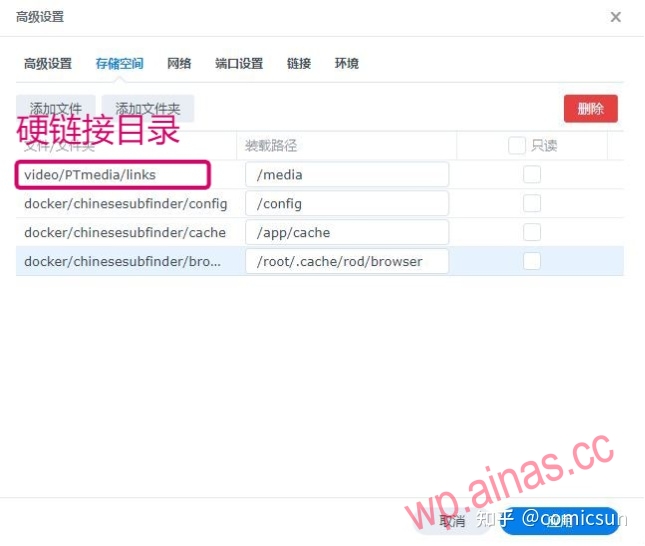
First, go to the official file structure diagram: This is the official file level description. This is the most common place to make mistakes. You must pay special attention to it. Many people make mistakes in this step, resulting in the subsequent inability to automatically recognize hard link transfers.Look carefully at the picture above. It doesn’t matter if you don’t understand it. Just follow my example:
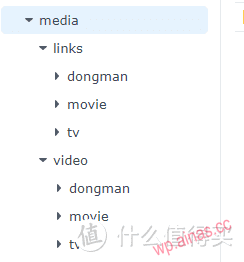
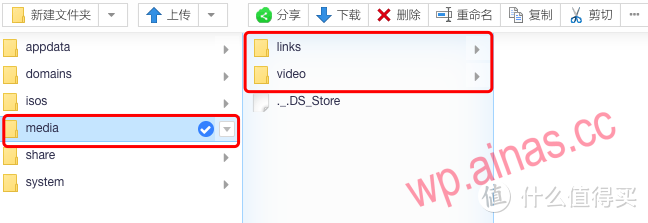 First, create two folders in the media folder: video and links.
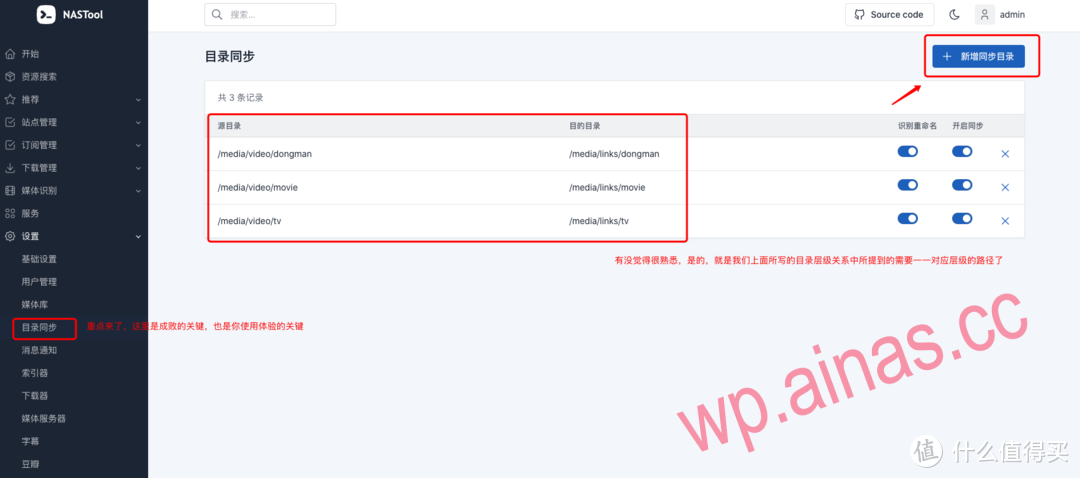
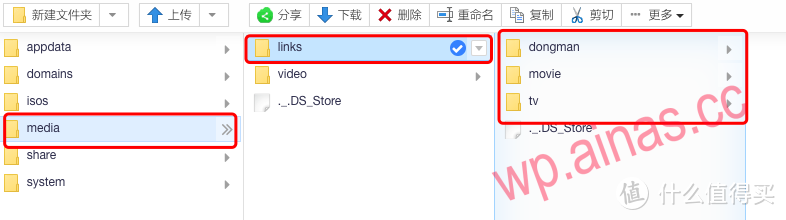 Create 3 folders under the links folder (this is created based on actual conditions)
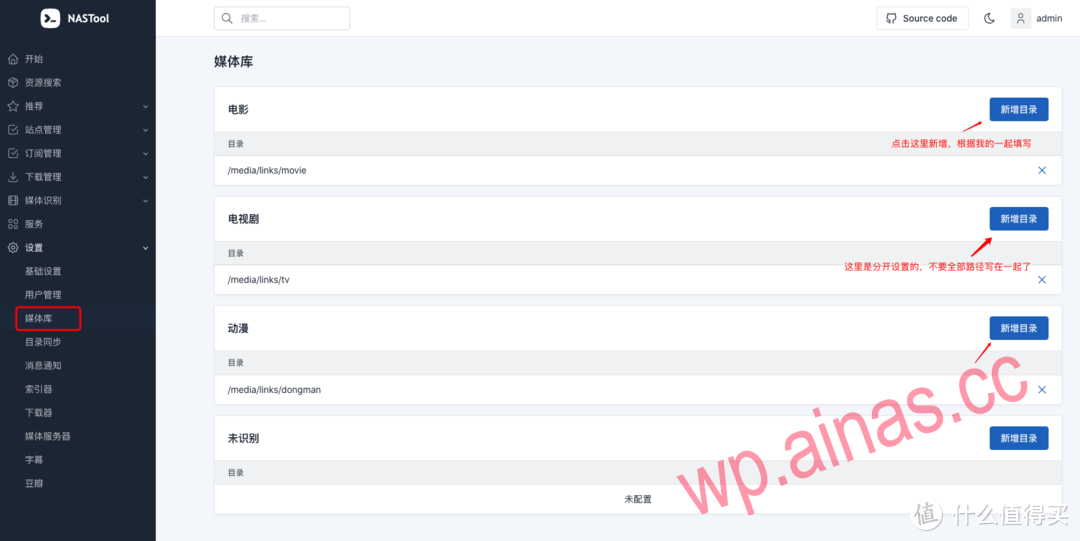
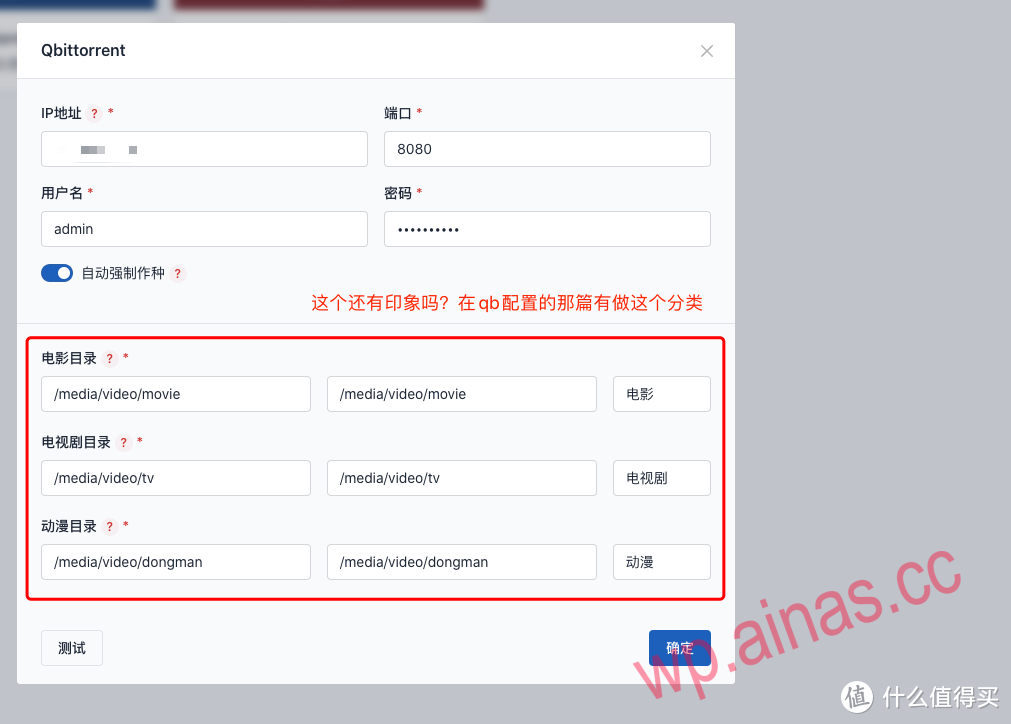
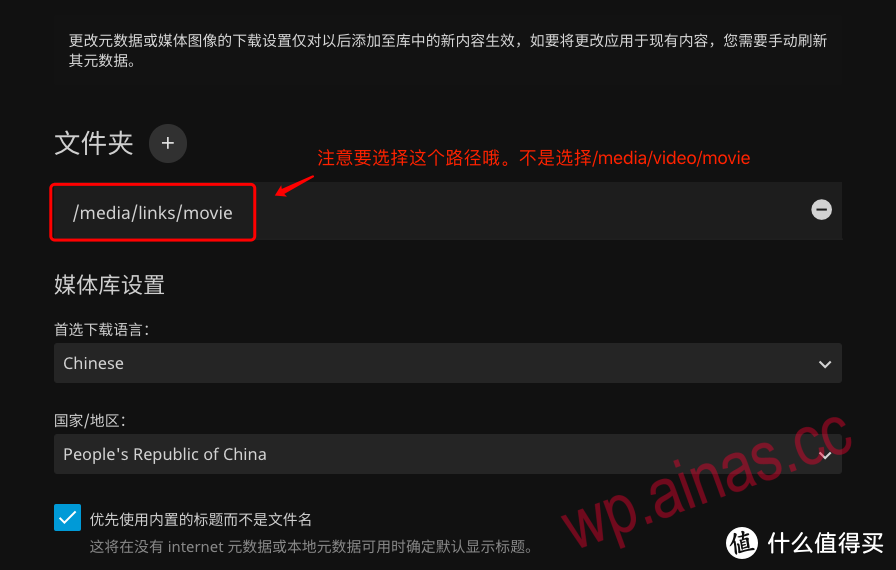
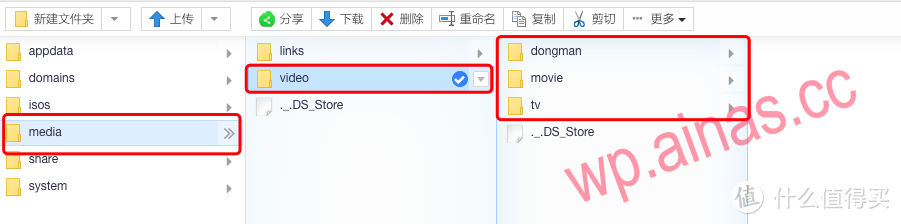 Create 3 folders under the video folder (this is created based on actual conditions)video/movie is used to install downloaded movies. The corresponding hard link path is links/movie
video/tv is used to install downloaded TV series. The corresponding hard link path is links/tv
video/dongman is used to install downloaded animations. The corresponding hard link path is links/dongman
Because we have mapped unraid’s media folder directly to media to nas-tools when installing the container.
Here is the corresponding relationship:
unraid /media/video/movie corresponding to nas-tools is /media/video/movie
unraid /media/video/tv corresponding to nas-tools is /media/video/tv
unraid /media/video/dongman corresponding to nas-tools is /media/video/dongman
Everyone should be able to understand it if I write it this way.
Briefly explain the directory hierarchy correspondence:
/media is a first-level directory, no matter how many levels it is in unraid, for nas-tools, it is the first-level directory
/video and /links are secondary directories. No matter what level it is in unraid, for nas-tools, it is the secondary directory.
Then the folders created in /video and /links are all third-level directories.
In the settings of nas-tools, this file hierarchical relationship is very important. If you don’t understand it yet, just copy mine. If you understand, you don’t need to copy mine, you can customize it. You can write anything, but the directory hierarchy must correspond one to one. I was stuck here for half a month. After replacing the nas system (the nas system on the market [Qunhui,OVM, turenas, freenas, unraid and other systems], basically installed them all except those that were closed and unusable). Finally, when I looked at the official directory hierarchy description, I suddenly realized that these articles came out.
Enter IP:3000 in the browser address bar to open the login page. The default account is admin, and the default password is password.
I would like to give the author a thumbs up here. The updates are very positive and the feedback issues are dealt with in a timely manner. Now, new features are being improved and updated almost every day. Click 10,000 likes for this project that uses love to generate electricity??. For those who don’t like this project, please don’t discredit it if you don’t use it. We won’t discredit it if we don’t use it. The default account is admin, and the default password is password.
 This fully configured homepage
 Set up as shown in the picture
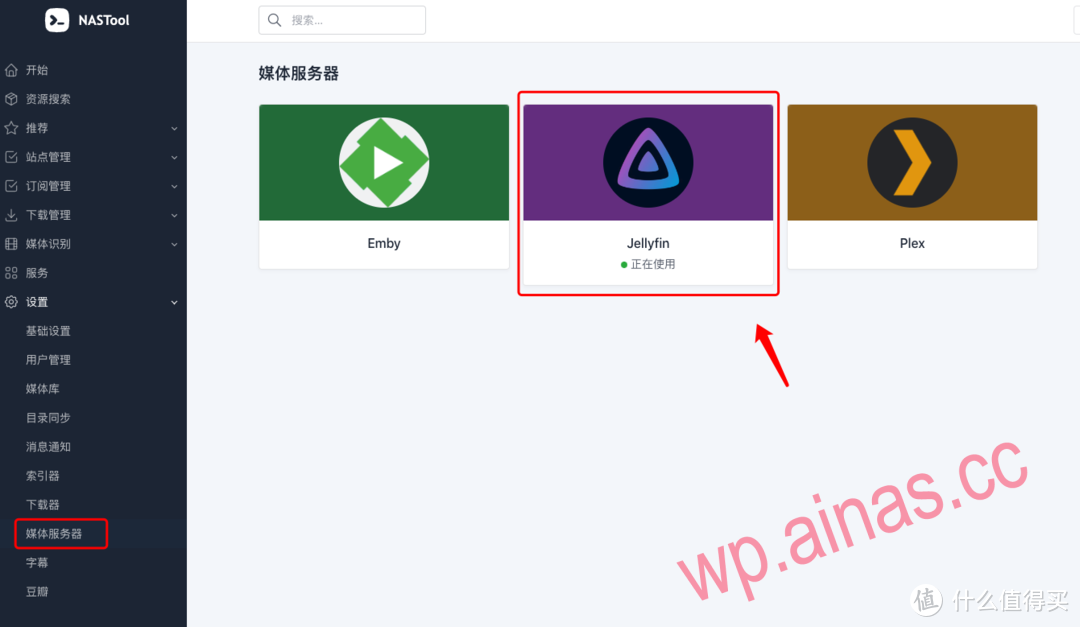
 This directory is consistent with the directory set in jellyfin below.
 This is the key point. Once again, you must abide by the rules of the directory level, otherwise you will not succeed.
 This is the rendering of the successful configuration in the message notification.
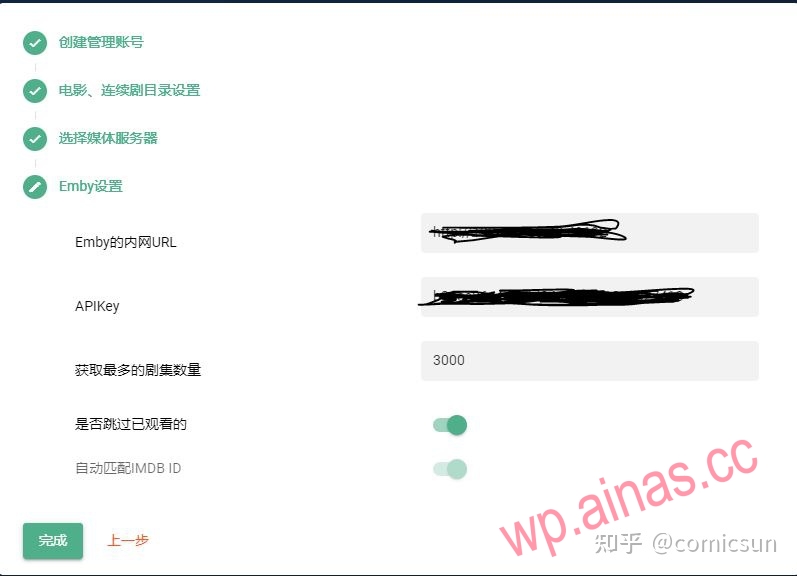
 Fill in this API KEY to the position in the picture above
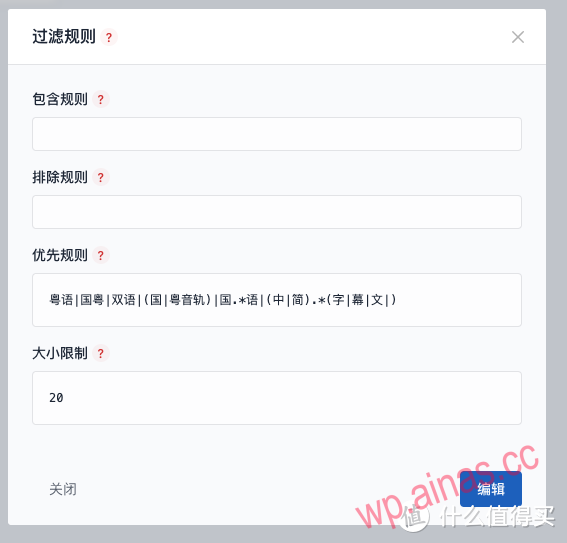 This is a rule, that is to say, when you send a message on WeChat, when the system searches, it will automatically filter according to this rule, and those that meet the conditions will be downloaded. Because I am Cantonese, so as you know, many Hong Kong dramas like to listen to the original Cantonese version. so. . .

 It should be noted here that the media path is not for video but for links. Because the links have been processed by nas-tools, there is basically no error when scraping with jellyfin.
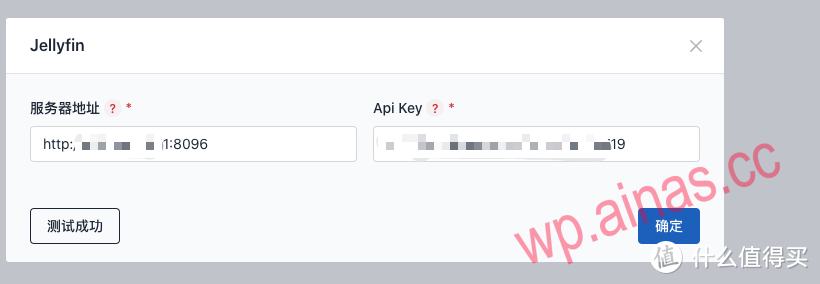
 Copy and paste this API into the API Key location in the picture below.
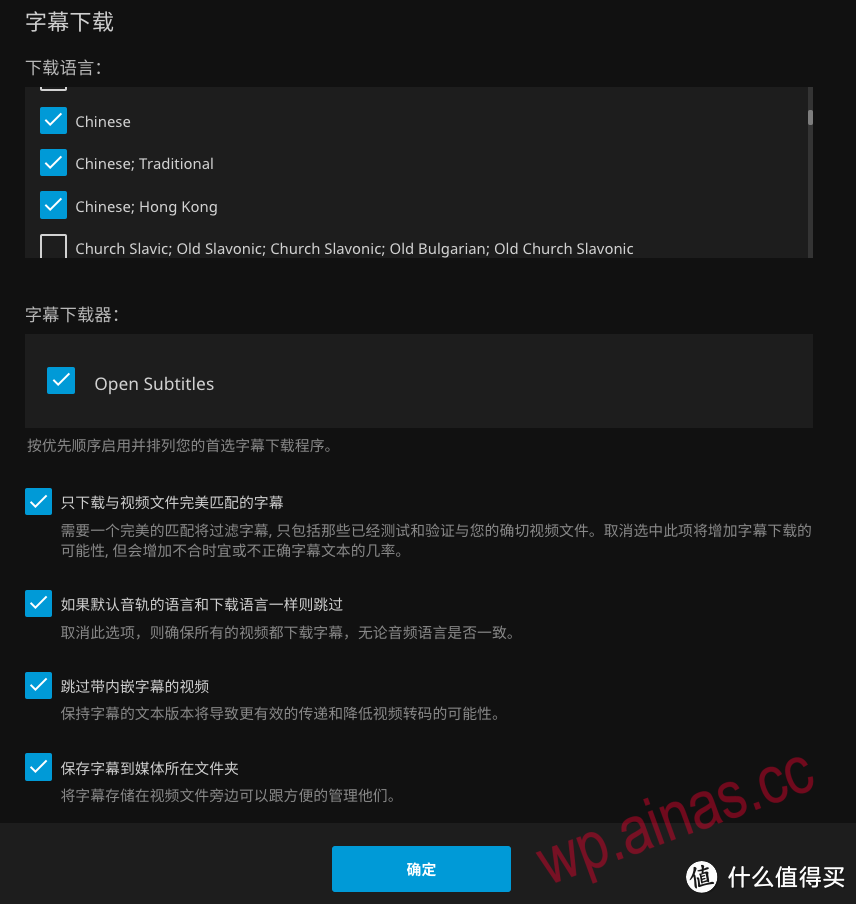
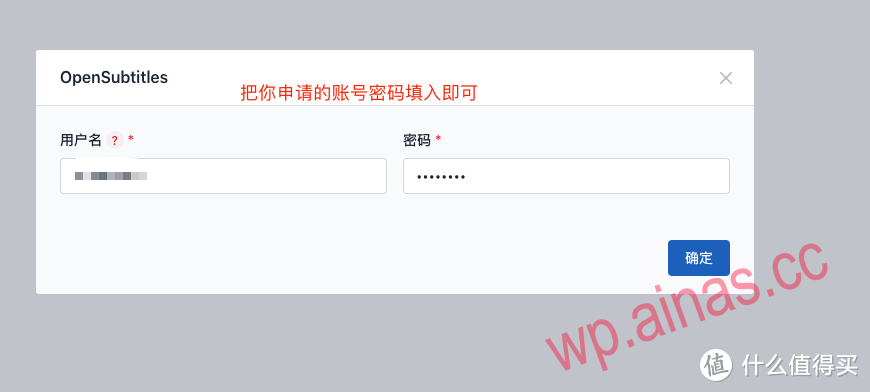
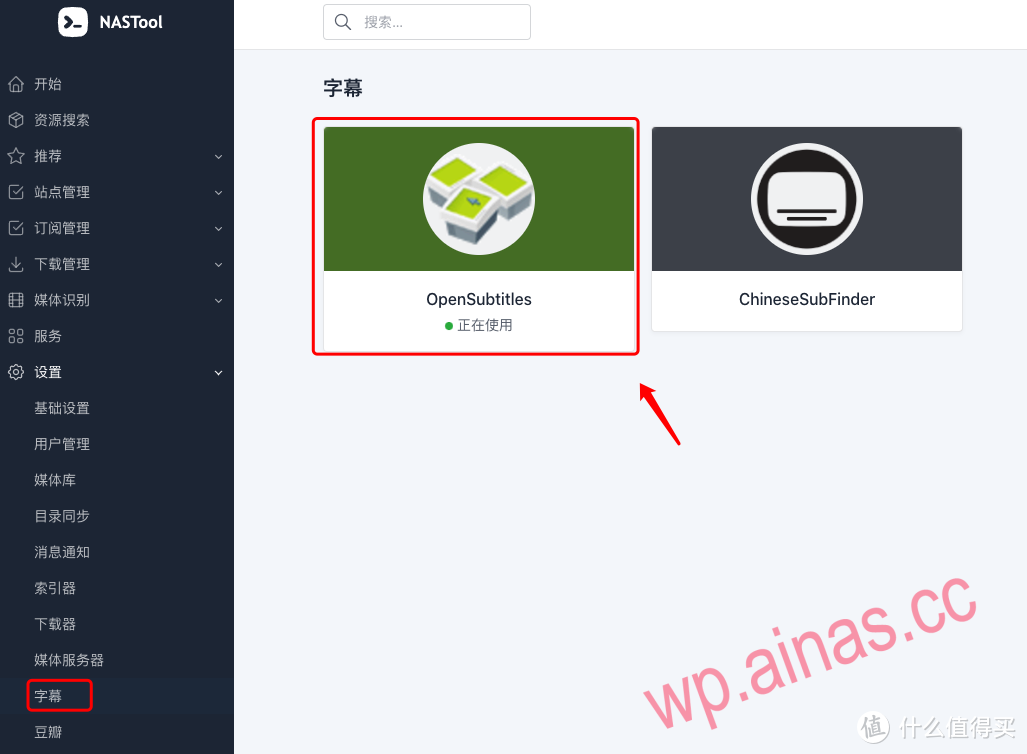 There are two ways to download subtitles. The first one is simple. Just register an account and enter your account password. But the second type is more powerful. It collects currently commonly used subtitle websites and conducts comprehensive searches, but it is a pity. I haven’t understood the configuration yet. I’ll write an article later when I have time to study it.
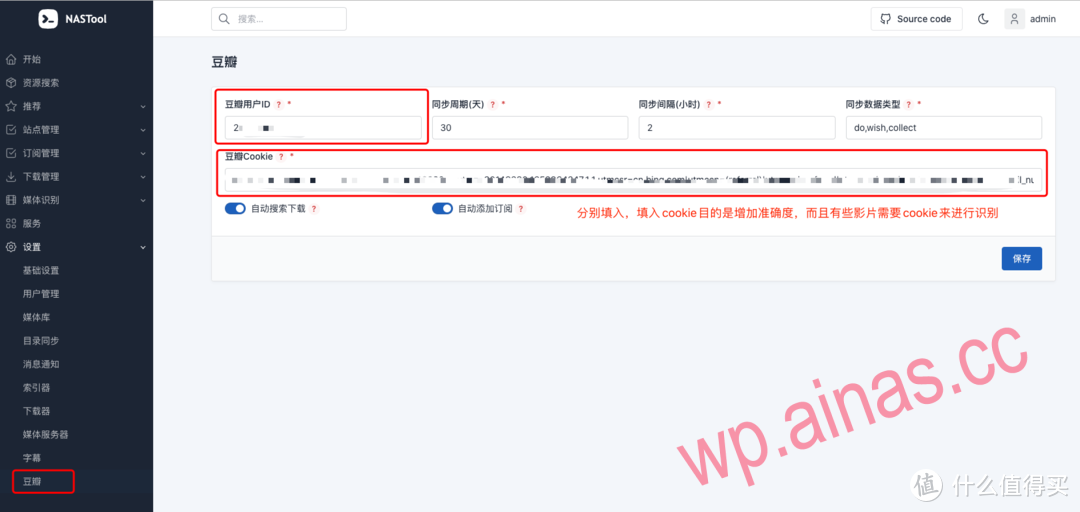 This is from Douban. How to get it? Please read the previous article.After the above configuration, there is basically no problem.
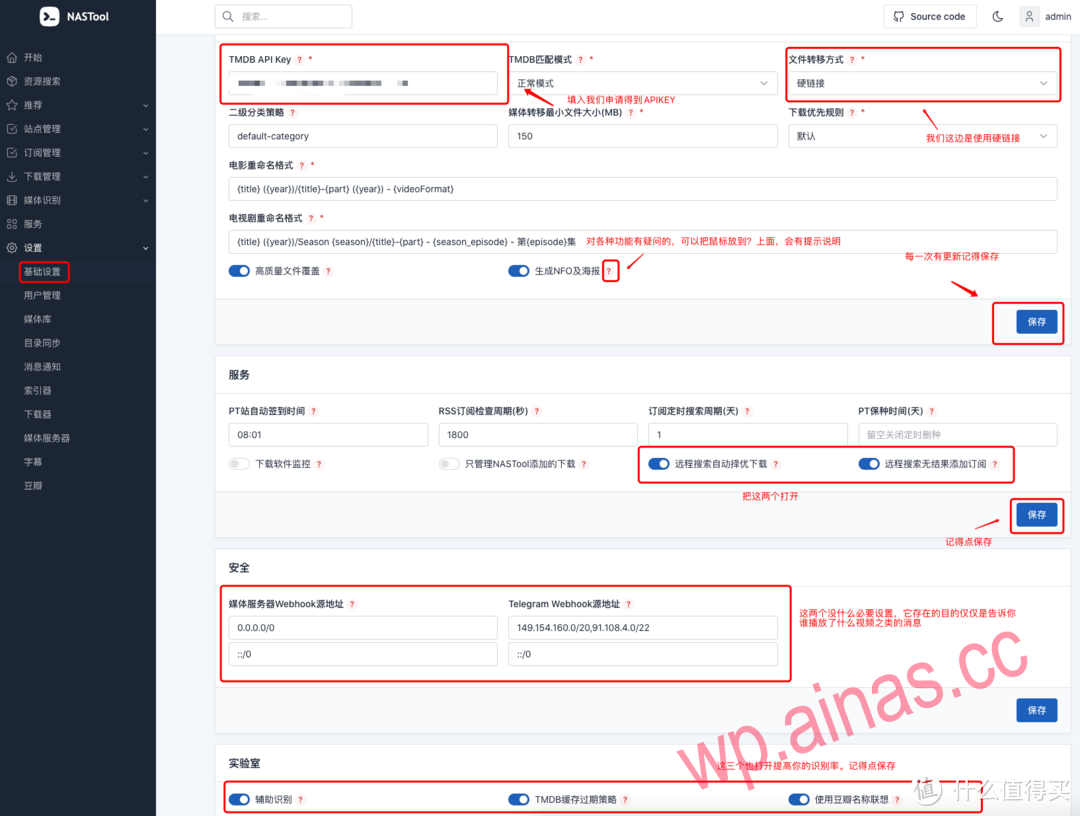
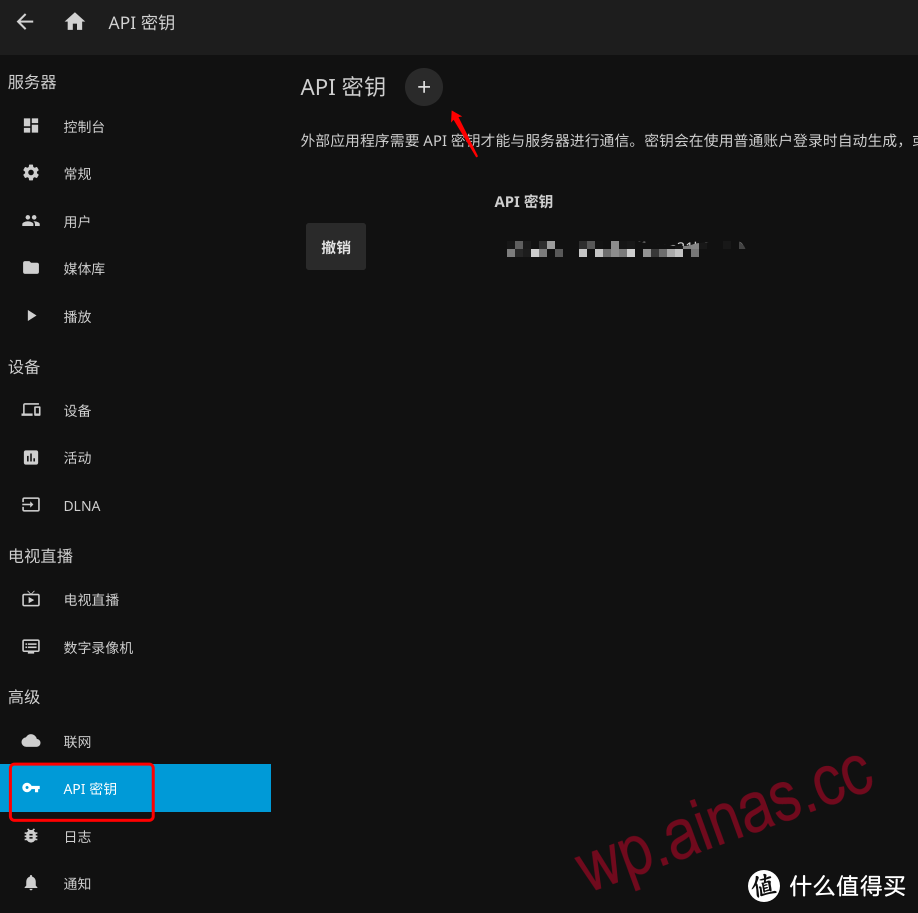
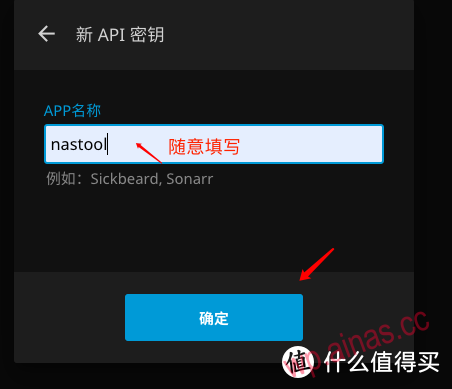
First clickhereOpen the official website of TMDB via the link below, register an account, log in, and click My–Edit Information–API to apply. Above: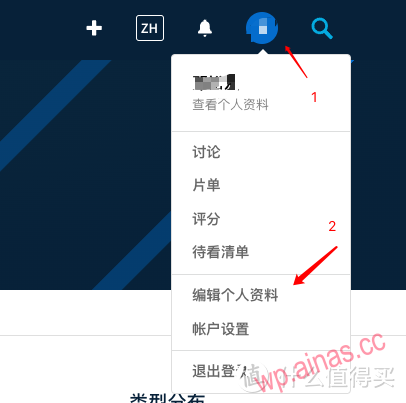
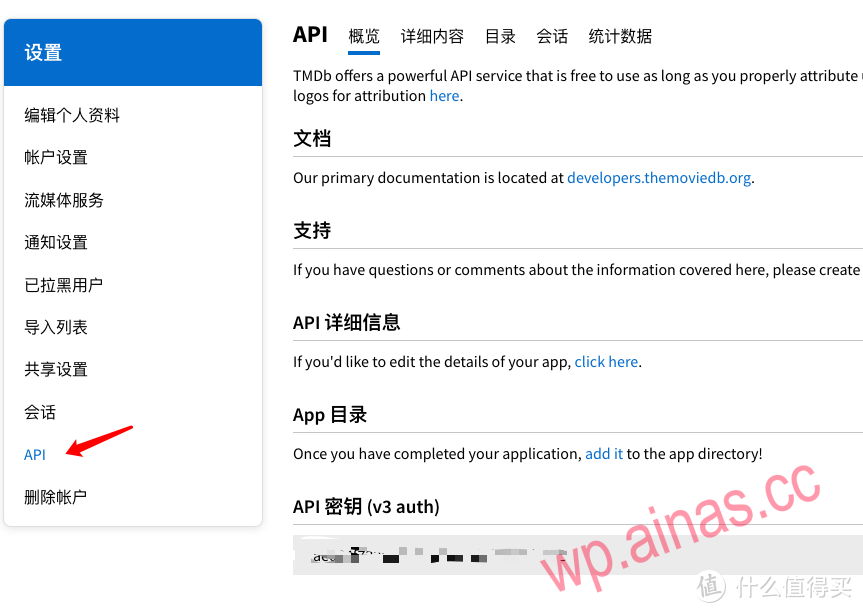 I have already applied.At this point, the API of TMDB is obtained.
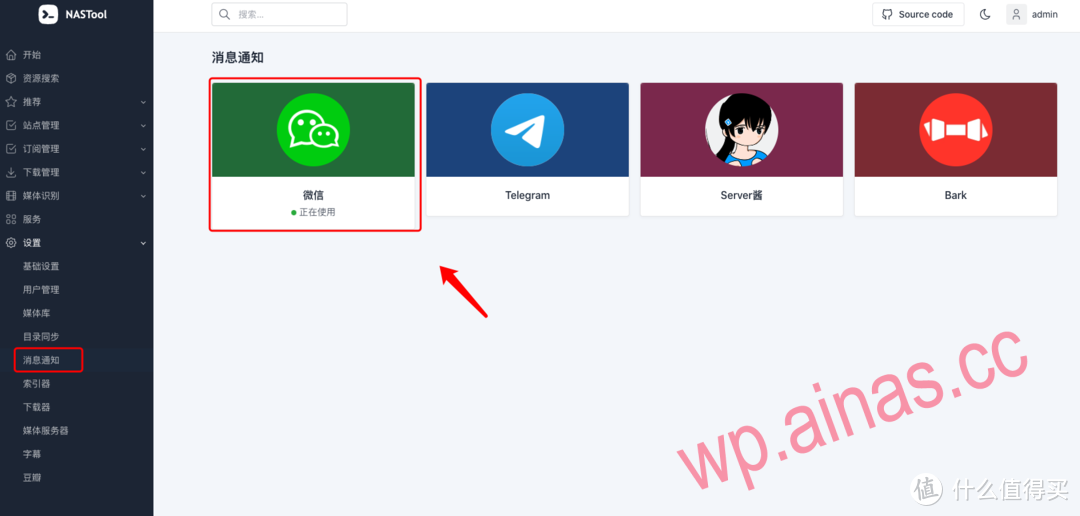
First, download Enterprise WeChat and create a business. So far, individuals can still create businesses, and then log in to your Enterprise WeChat.Web pageend
Configure WeChat menu/Telegram robot (I don’t have that kind of environment in tg, so I won’t talk about it here)
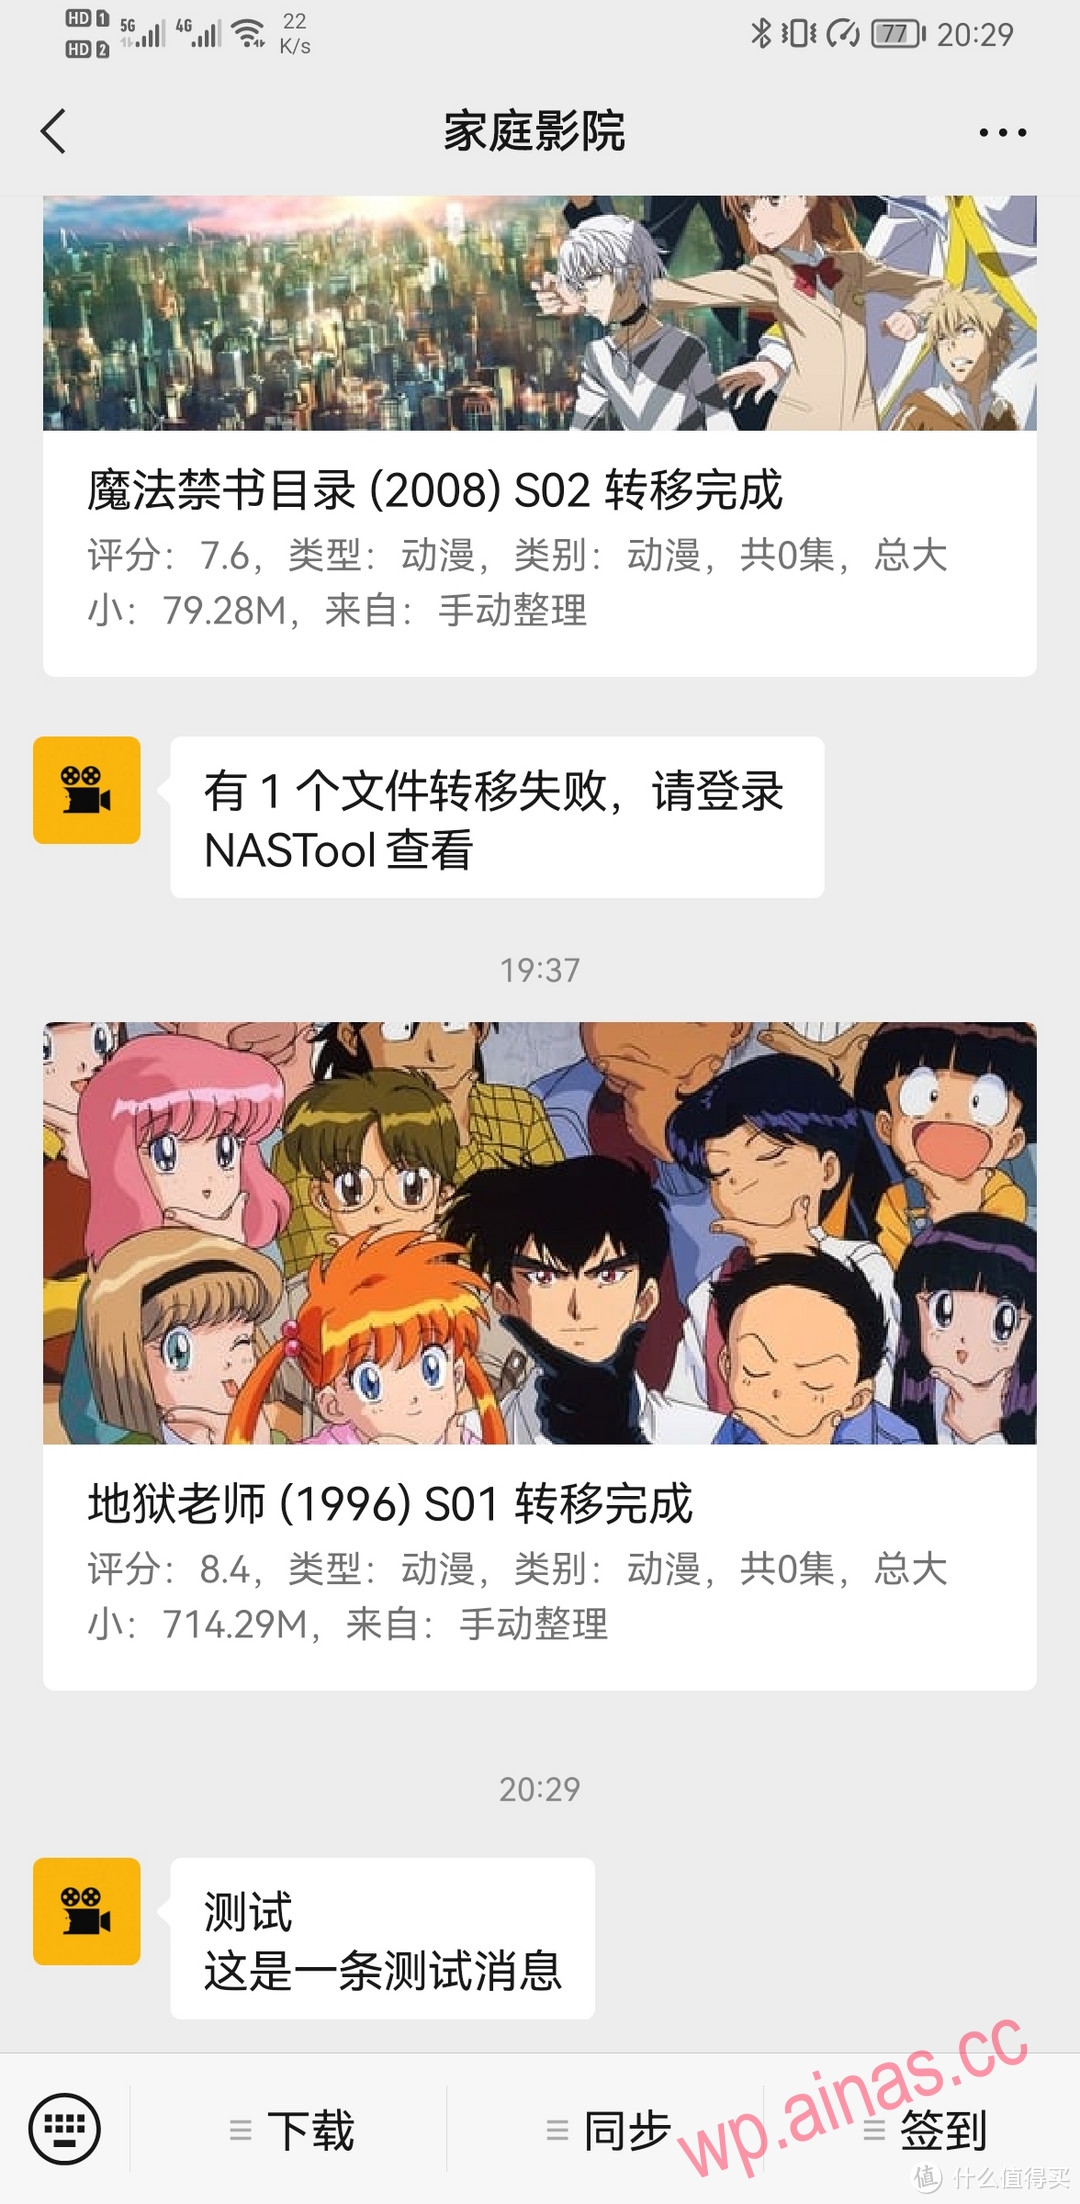
After configuring the WeChat or Telegram robot, you can directly send the name through the WeChat/Telegram robot to realize automatic retrieval and download, and control the operation of the program.
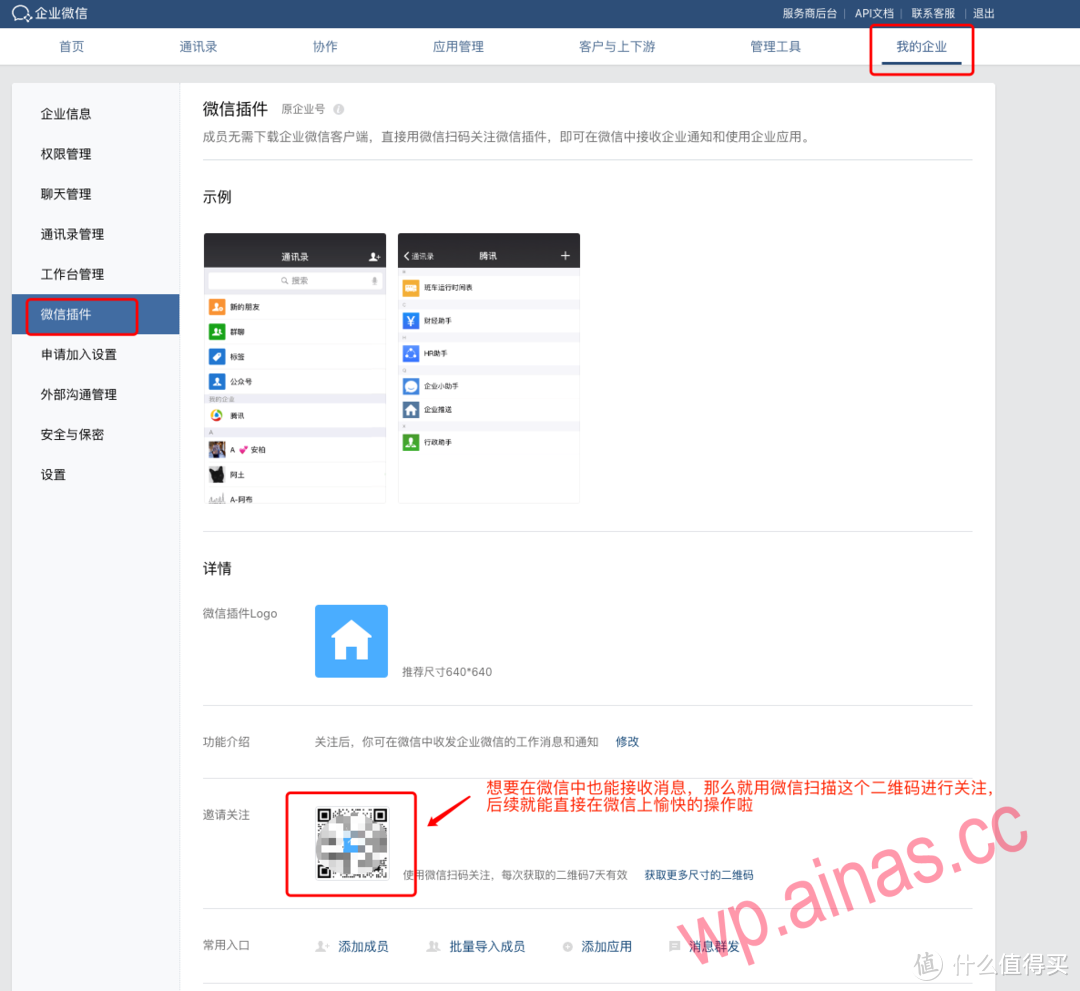
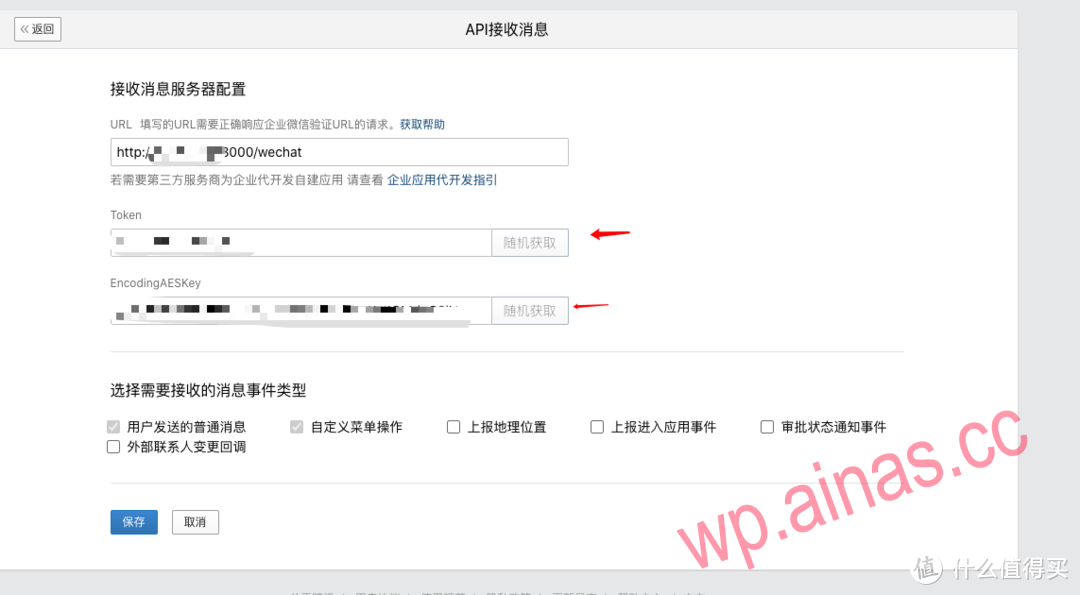
Configure the WeChat message receiving service: Go to the enterprise WeChat self-built application management page – “API to receive messages” to enable the message receiving service:
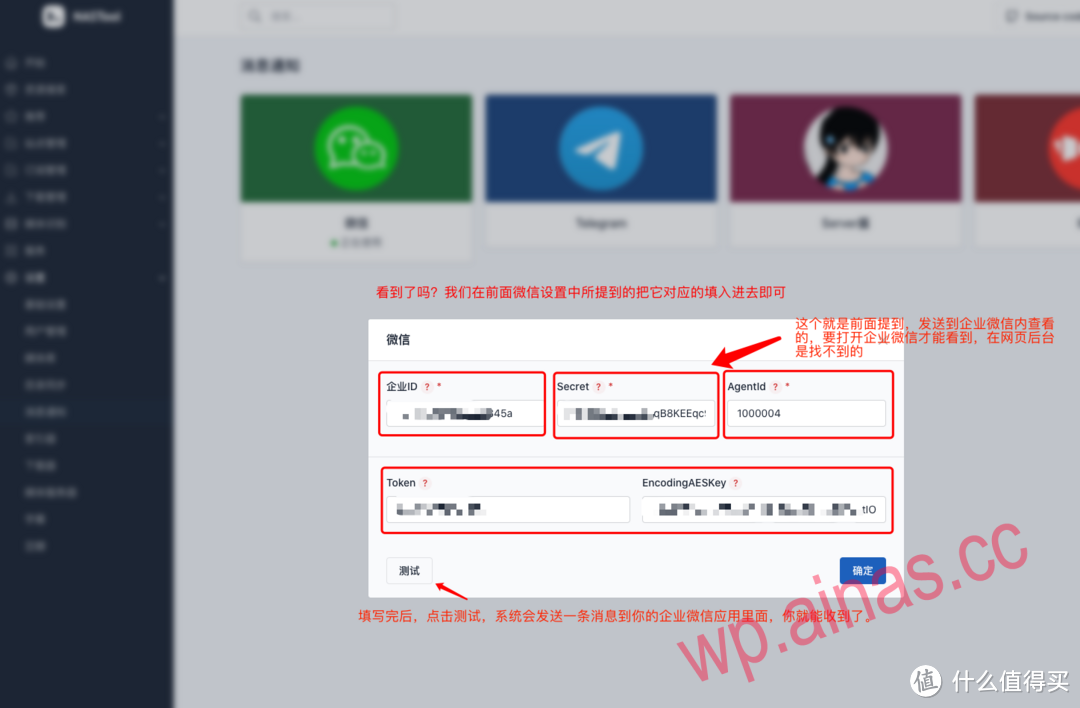
1. Generate Token and EncodingAESKey on the WeChat page, fill in the corresponding input items in NASTool Settings->Message Notification->WeChat and save.
2. Restart NASTool.
3. Fill in the WeChat page address URL: http(s)://IP:PORT/wechat, and click OK to authenticate.
Configure WeChat menu control: there are two ways,
One is to enter commands directly in the chat window;
Second, inhttps://work.weixin.qq.com/wework_admin/frame#appsApply the custom menu page to maintain the menu as shown in the figure below (the order of entries needs to be exactly the same, if it is different, you need to modify the WECHAT_MENU menu number definition defined in config.py). The menu content is to send a message, and the message content is a command.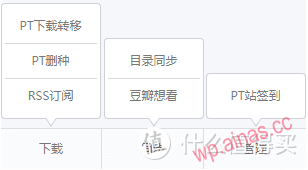
Correspondence between commands and functions:
Command function
/rssRSSsubscription
/ptt PT download transfer
/ptr PT delete seed
/pts PT station check-in
/rst directory synchronization
/db Douban wants to see
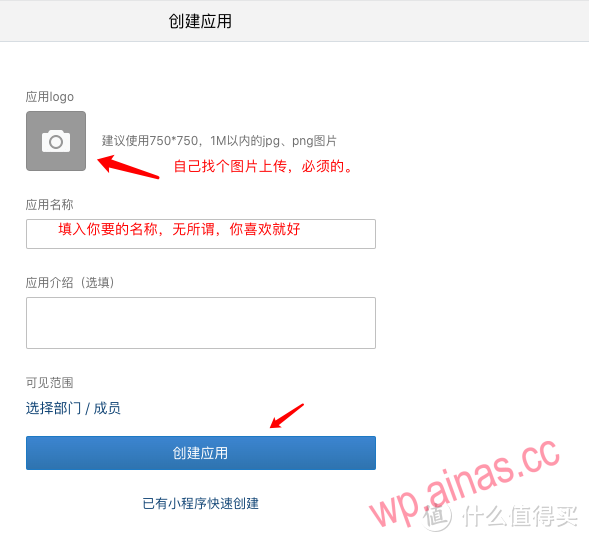
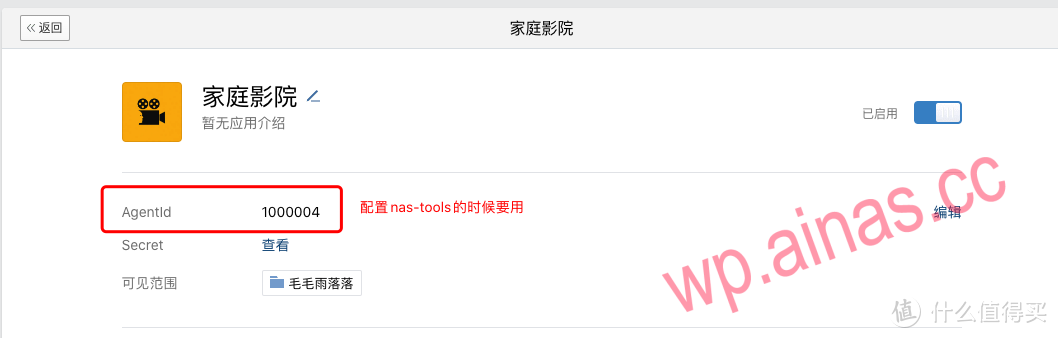
The specific settings are as follows: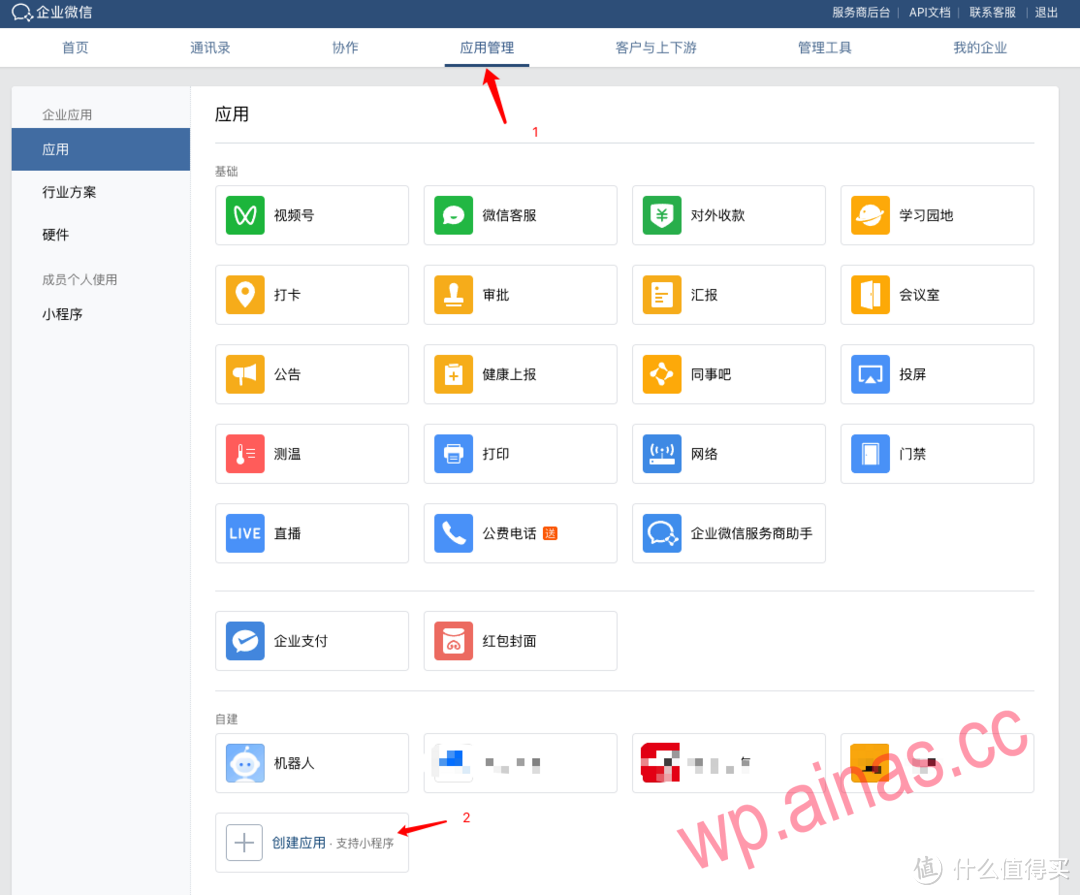 Register for Enterprise WeChat, log in to the backend, click on Application Management, find the Create Application below and click on it
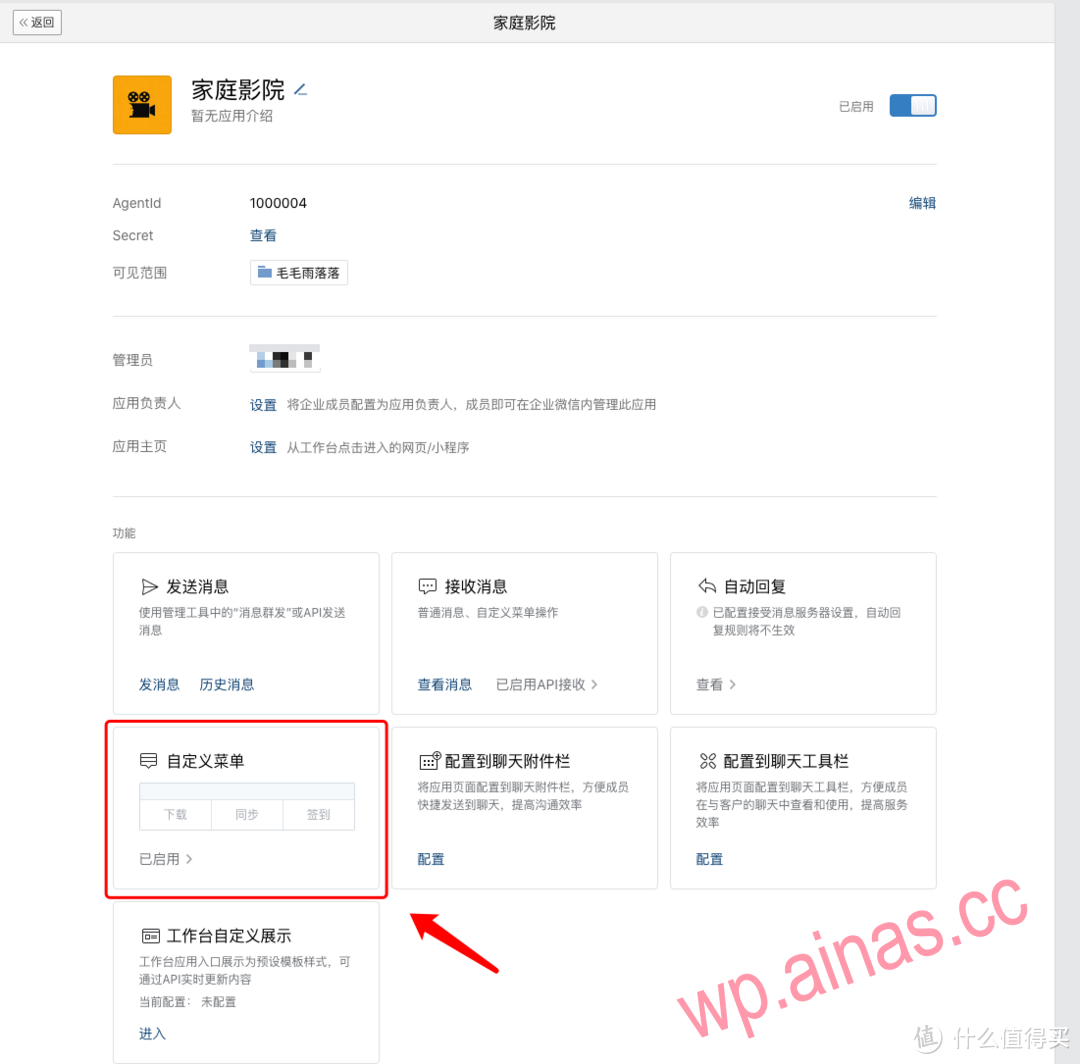 Click on a location on the image to create a menu
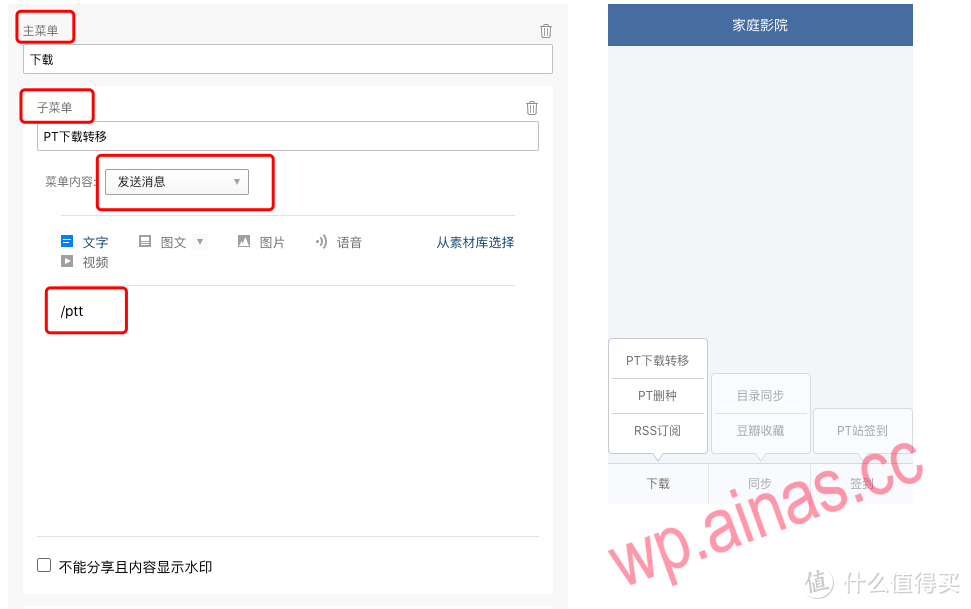
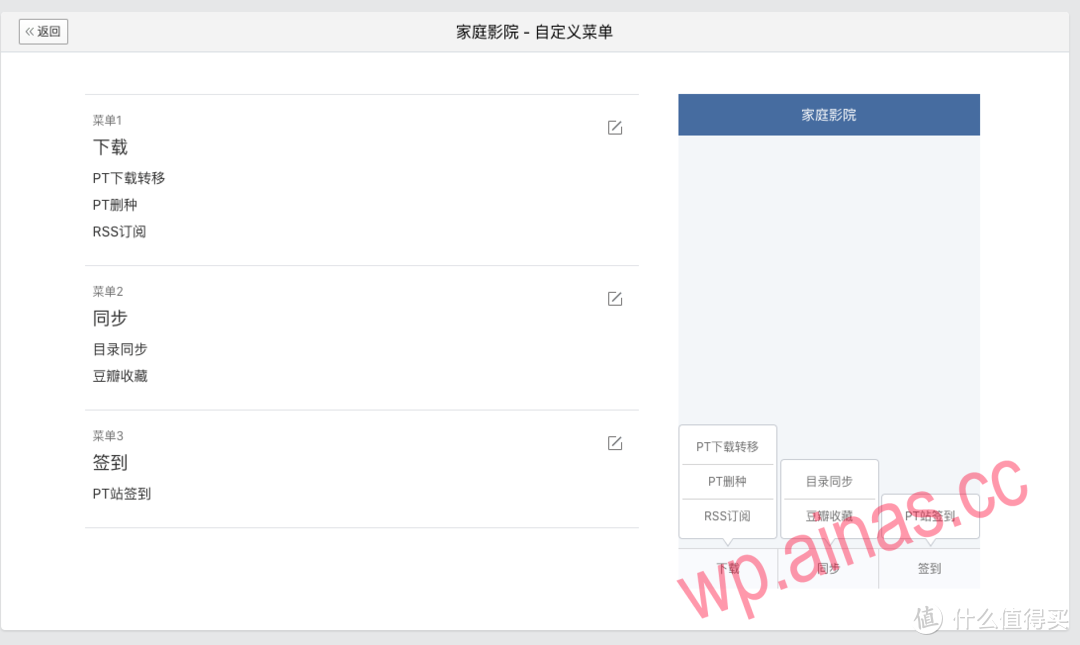 Configure the menu according to my method above. See the picture below for how to configure the command.
 Read it carefully, try to understand it, and draw inferences from one example. The corresponding functions and commands have been given above. Just enter it accordingly.The configuration of the menu ends here. The next step is to configure the automatic retrieval and download by sending the name directly through the WeChat robot, and control the operation of the program.
 This actual measurement can be called back through domain names, but the domain names must be first-level domain names and cannot be certain domain names owned by certain companies. For example, a peanut shell domain name will not work.

 Now the WeChat application is set up.
The purpose of setting up Douban is:
1. Enhance search accuracy
2. Mark it in Douban and automatically search it in the background. If it is not complete, it will automatically be added to the subscription and updated.
First open the website,https://www.opensubtitles.org/enRegister your account and password and remember the account and password. No VIP required.